Introduction
The typical use case of SRE configured as registrar is where a customer has a SIP PBX which must register to a Service Provider, and the Service Provider has an Access SBC and an SRE platform. The Registrar and Digest Authentication feature needs to be enabled on the SRE platform via the registrar license so that each Call Processor Instance can act as a SIP Registrar and can authenticate SIP messages. Registration data (Location Service) is dynamic and is stored in a MongoDB database that can be distributed on multiple servers with a mechanism preventing split-brain. Typically, the Mongo database will be deployed as a three-member replica set. Besides the typical SRE requirements, some additional requirements related to MongoDB must be fulfilled.
Terminology
- Domain. This is the domain of the SIP Registrar/Proxy server. It is unique for the complete SRE platform. By default in Kamailio this is the IP address of the SRE Registrar server, but it can be changed by setting the alias parameter in kamailio.cfg:
/* add local domain aliases */
alias="netaxis.be"
A restart of Kamailio is required.
AoR (Address of Record). This is the URI identifying the PBX, used as identifier by the PBX to register. As the domain is unique, we usually only work with the user part of the Address of Record (in the SRE data model and the script).
PBX Contact. This is the URI of the PBX containing the IP address/port of the PBX.
Location Service. It contains bindings created during PBX registration: a binding is a couple (PBX AoR, Contact).
PBX DIDs. Direct Inward Dialing numbers, numbers behind the PBX
Sample configuration for registering a user
Use a SIP client of your choice (for example X-Lite), and configure it with the typical information:
- User ID is the user part of the PBX AoR
- Domain is the SRE Registrar domain
- Address is the outbound proxy (SBC, …)
In the REGISTER message, the following information is observed:
- The domain, in the Request URI of the SIP REGISTER messages sent by the PBX
- The Address of Record of the PBX, in the TO header field
- The Contact field, in the CONTACT header
REGISTER sip:netaxis.be SIP/2.0
Via: SIP/2.0/UDP 10.0.9.166:5060;branch=z9hG4bK-524287-1---3f6c1d404b0e8958
Max-Forwards: 70
Contact: <sip:john@10.0.9.166:5060;rinstance=21ba7bb0142bc22f>
To: <sip:john@netaxis.be>
From: <sip:john@netaxis.be>;tag=c8243546
Call-ID: 92984MGM3ZmY0Nzk5MmRkNmM2MmVlNjU2YjkzOTZiOWRkZjE
CSeq: 1 REGISTER
Expires: 3600
Allow: SUBSCRIBE, NOTIFY, INVITE, ACK, CANCEL, BYE, REFER, INFO, OPTIONS
User-Agent: X-Lite release 5.3.3 stamp 92984
Content-Length: 0
Database for the SRE Registrar
The database can vary depending on the requirements of the customer, but as minimum, it should contain the following tables (names of the tables and fields can be customized)
Table customers

A Subscriber represents a PBX that registers to the SRE Registrar. Each Subscriber hosts several DIDs.
Table customer_numbers

It contains the numbers belonging to the customer. The column customer_id is a foreign key of the table customers.
Note: the boolean is_range is not strictly necessary. The registration itself is working also without.
Configuration example
Entry of table customers

Entry of table customer_numbers

Service Logic scripts
A basic service logic script that needs to handle authentication requires at least the following blocks:
- Sequential and Combined conditions blocks, to be used in several steps, are described later in this document
- Database query, to retrieve username, domain, and passwords to handle the authentication (on PostgreSQL DB)
- Save in Location Service, which saves the data of the authenticated user (on MongoDB)
- Authenticate, which checks the password
- Lookup and Relay, which looks for the data of the authenticated user, and forwards the call to it
Example of Location Service data on MongoDB:
sre_location:PRIMARY> db.location.find()
{ "_id" : ObjectId("5c3621d6b9dd1601c33e19a1"), "username" : "john", "contact" : "sip:john@10.0.9.166:5060;rinstance=21ba7bb0142bc22f", "expires" : ISODate("2019-01-09T17:31:17Z"), "q" : -1, "callid" : "92984MGM3ZmY0Nzk5MmRkNmM2MmVlNjU2YjkzOTZiOWRkZjE", "cseq" : 1, "flags" : 0, "cflags" : 0, "user_agent" : "X-Lite release 5.3.3 stamp 92984", "received" : null, "path" : null, "socket" : "udp:10.0.12.26:5060", "methods" : 4831, "last_modified" : ISODate("2019-01-09T16:31:17Z"), "ruid" : "uloc-5c362091-1c3-1", "instance" : null, "reg_id" : 0, "server_id" : 0, "connection_id" : -1, "keepalive" : 0, "partition" : 0 }
Several scripts must be built, to handle authentication, incoming and outgoing calls. In the following sections, the three basic scripts are described.
Authentication and SRE registrar
When receiving a SIP REGISTER, we want to identify the subscriber, using:
- the user part of the To header field URI (subscriber name)
- the username in the Authorization header field (subscriber username)
A SIP server can authenticate SIP messages (REGISTER or INVITE messages). When receiving a REGISTER message, the SIP server sends a 401 Unauthorized response with a realm and a nonce (the realm is the host part of the From URI in the original REGISTER message, for the sake of simplicity it’s better to have it the same as the domain). The client sends a new REGISTER message with the credentials. This REGISTER message includes:
- the PBX AoR in the To header field
- the PBX authentication username in the Authorization header field
- the realm in the Authorization header field
REGISTER sip:netaxis.be SIP/2.0
Via: SIP/2.0/UDP 10.0.9.166:5060;branch=z9hG4bK-524287-1---2e4815090eba6d57
Max-Forwards: 70
Contact: <sip:john@10.0.9.166:5060;rinstance=80cbcfa222fe3e29>
To: <sip:john@netaxis.be>
From: <sip:john@netaxis.be>;tag=c82b9e5a
Call-ID: 94385MjllYzhkMmFkNjM5MjY2OTkzYjdmMGRhZTMzN2IxODk
CSeq: 2 REGISTER
Expires: 3600
Allow: OPTIONS, SUBSCRIBE, NOTIFY, INVITE, ACK, CANCEL, BYE, REFER, INFO
User-Agent: X-Lite release 5.4.0 stamp 94385
Authorization: Digest username="authjohn",realm="netaxis.be",nonce="XDipw1w4qJcFs8l+fUJL63l9kMZd8hGL",uri="sip:netaxis.be",response="964a58f681001cccc01125c4a477e6c9",cnonce="e772a5a83716691d77d39c43f526e0ab",nc=00000001,qop=auth,algorithm=MD5
Content-Length: 0
Then we want to authenticate the user by checking the response in the Authorization header field with the subscriber credentials
In the database, the customers table must contain the name, username and password in clear text or in HA1 format. To build the password in HA1 format we need: the authentication username, the password and the realm. In linux shell, the command
echo -n username:realm:password | md5sumreturns the password in HA1 format. In the examples of this guide, the password in clear text is shown.
There are two new variables in the Call Descriptor:
- authStatus, tracking if the message has been authenticated
- authStatus = 1 means that the message has been authenticated
- authStatus = 0 means that the message has not been authenticated (default)
- authUsername, containing the username parameter in the Authorization header field
Simple Service Logic script for registration with authentication
In the picture below is a typical example of registration script.

A REGISTER message reaches SRE, and by default authStatus = 0: the message is not authenticated. The Sequential Conditions block checks if the message has been already authenticated:

Since this is the first REGISTER, it is not, therefore authStatus = 0, and the analysis passes to the Combined Conditions block:
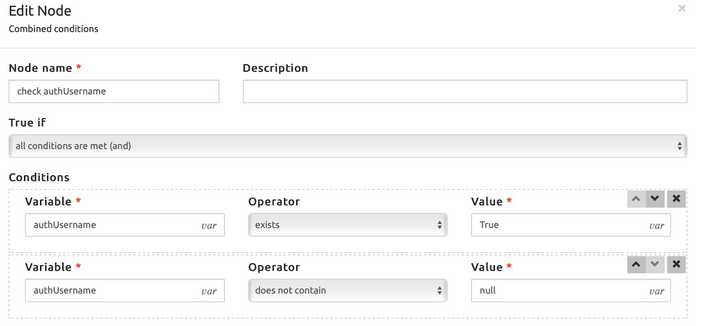
Since it is the first REGISTER, there is no authUsername present yet, and therefore SRE must challenge the REGISTER: the false exit is taken, and the block Authenticate is sending back the 401 Unauthorized error message. The client sends again the REGISTER message, with the Authorization header. At this stage, the Combined Conditions block is reached again, but this time authUsername exists and it is different from NULL, and therefore the Database Query block is selected (see the picture in the next page):
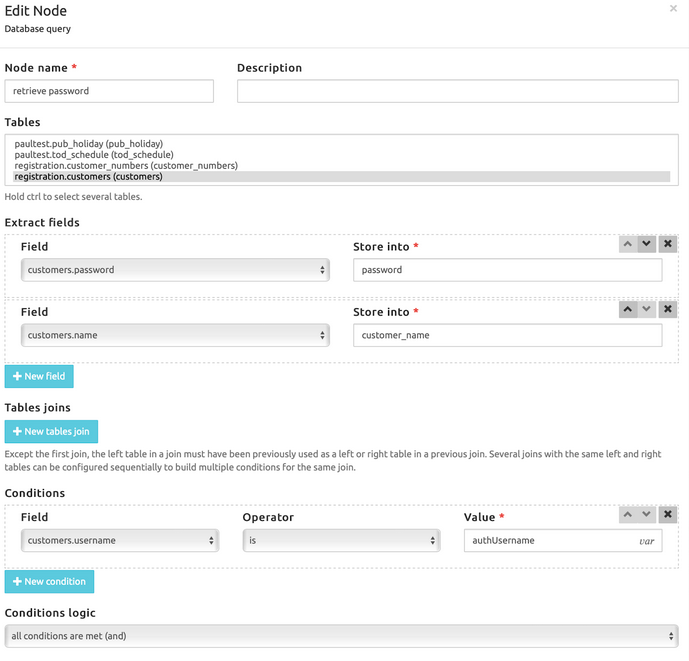
- The authUsername extracted from the Authentication header is searched inside the database table customers (customers.username)
- If there is a match, the password stored in the database is saved in the variable password and the customer’s name is saved in the variable customer_name
After the extraction of the data from the database (successful or not), the Authenticate block acts as follows:
- If the authentication fails, the SRE Registrar will challenge the subscriber (as the first REGISTER)
- If the authentication succeeds, the SRE sets the parameter authStatus to 1
At this point, the script is re-executed again (even without a new REGISTER message), this time following the route with authStatus = 1.
So, considering what described above, the script is used 3 times:
- first time for generating the 401 Unauthorized message with the challenge
- second time to authenticate the message
- third time to save the binding in the Location Service
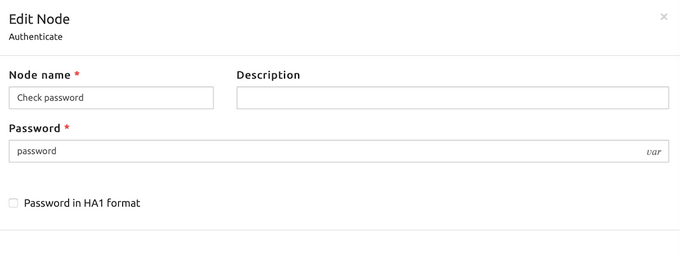
INFO
the Authenticate block is configured as in the next picture: the password variable is simply password (as extracted by the database query node) and there is the flag to instruct SRE to handle the password as HA1 encrypted or not.

INFO
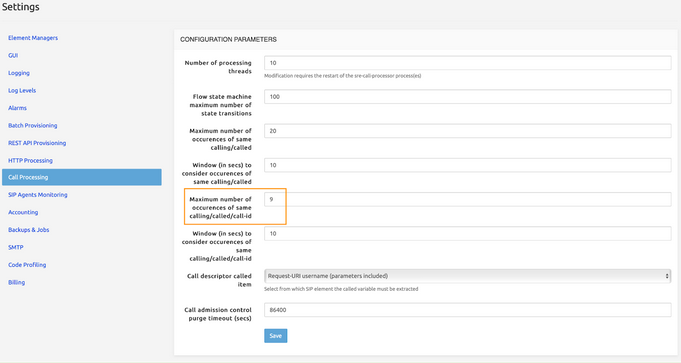
As the SRE handles a SIP message three times in a row, we need to increase the maximum number of occurrences of same calling/called/call-id to avoid a 482 Loop Detected condition.
Call authentication
After a registration, a user sooner or later will place a call. The call is initiated with an INVITE message, which must be authenticated as the REGISTER, to authorize the execution of the call. When receiving a first INVITE message, the SIP server sends back a 407 Proxy Authentication Required response with a realm and a nonce (the realm is the host part of the From URI in the original INVITE message). The client sends a new INVITE message with the credentials. This INVITE message includes:
- The PBX authentication username in the Authorization header field
- The realm in the Authorization header field
The following is an authenticated INVITE, containing the Proxy-Authorization header.
INVITE sip:6756757@netaxis.be SIP/2.0
Via: SIP/2.0/UDP 10.0.9.166:5060;branch=z9hG4bK-524287-1---f726055e5bd50f2a
Max-Forwards: 70
Contact: <sip:john@10.0.9.166:5060>
To: <sip:6756757@netaxis.be>
From: <sip:john@netaxis.be>;tag=db3e0038
Call-ID: 94385MjJkMGMyZDFhZWYxYTllMjQ0NWY1Y2UyN2IzNzg5MWY
CSeq: 2 INVITE
Allow: OPTIONS, SUBSCRIBE, NOTIFY, INVITE, ACK, CANCEL, BYE, REFER, INFO
Content-Type: application/sdp
Proxy-Authorization: Digest username="authjohn",realm="netaxis.be",nonce="XD2dllw9nGp/4owDSHCj+nwRz5HURClC",uri="sip:6756757@netaxis.be",response="bdd367676f43619efd1ee535c728ef80",cnonce="834188b82cd53bfaee8eaf7c1cafe1f9",nc=00000001,qop=auth,algorithm=MD5
Supported: replaces
Outgoing call: simple script for a call with authentication
This is the typical case of a call placed by a customer’s user, behind the PBX registered on SRE. In the picture below a combination of the registration and INVITE authentication process is shown.

The (sub)service logic presented above is a subservice logic used only for the registration and authentication. When the subservice logic is recalled, it checks if the method is a REGISTER or an INVITE: in case of registration and the authentication is successful (authStatus == 1), the user’s data must be saved in the location register database (save in location service block); in case of a call, and the authentication is successful, the call must continue in the SRE service logic (exit node in orange). That’s the only difference: the other blocks are valid both for the registration and the call authentication.
The combined conditions block checks if the message has been already authenticated or not, checking the variable authCondition, as for the REGISTER message.

If the INVITE is not yet authenticated, the combined conditions block checks if the authUsername is already available or not, so for the REGISTER message. If the authUsername is not available, the INVITE message must be challenged: this is done by the Authenticate block, as for the REGISTER message.
The user will send a new INVITE message with the Authentication header. The variabile authCondition is still 0, but this time the authUsername is available, therefore the block Database Query is taken. Similarly to what was happening during the registration, the username taken from the Authentication is searched in the customer’s table.
In the example below, authUsername is always identical to the fromUsername, and therefore the search is done with the fromUsername, but it is not usually happening
SRE compares the password of the database with the password in the SIP message, using the Authenticate block:
- if the authentication fails, SRE will challenge the subscriber again
- If the authentication succeeds, SRE sets the parameter authStatus to 1
At this point, the script is reused again (even without a new INVITE message), this time following the route with authStatus = 1: the INVITE is authenticated, and the call can proceed.
So, considering what described above, the script is used 3 times:
- first time for generating the 407 Proxy Authentication Required with the challenge
- second time to authenticate the message
- third time to proceed with the routing of the INVITE message
Incoming call: lookup in location services
In case of incoming call from PSTN to a registered user, SRE must look for the called number, verify that it is effectively registered, and then route the call according to the registration. The script below is showing such example:

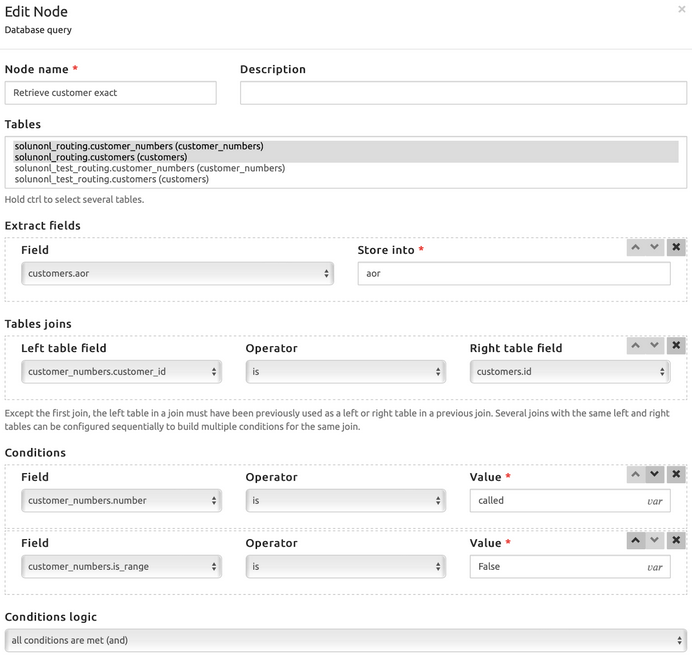
The first 3 blocks are used only to determine if the user is calling from PSTN or from the PBX, using the tgrp parameter of the Contact header only, and it is not affecting the lookup in the location services. The location services part is starting from the first Database Query, where SRE is looking for the called phone number into its database: the called number present in the Request URI is searched in the column number of the table customer_numbers (customers_numbers) and if it is successful, the AoR is stored, and used to build the new Request-URI, which is passed to the Lookup in location services block. Within this block, SRE will look for the Contact received during the registration phase and it relays the call with the Contact in the Request URI.
The second Database query node is similar to the previous one, but it is also checking the case the phone number is entered as number range (and therefore it is done the long prefix match search instead of the precise search). For the rest, nothing changes. If no number is found in the database, the call is rejected with a 404 Not Found message.
Call Screening
The goal is to check that the CLI and the credentials in the INVITE message belong to the same subscriber. The calling party number can be in several SIP header fields, and there is a priority (some header fields are more relevant than other ones). In the script below we use the following rule: the header fields containing the CLI in order of priority (highest priority first) are:
- Diversion
- P-Asserted-Identity
- Remote-Party-ID
- From
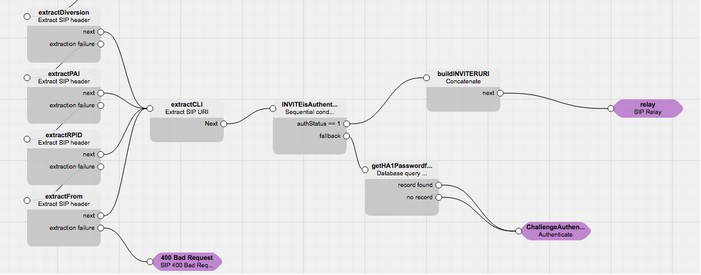
Here is an example on how to use the node “Extract SIP Header” to retrieve the SIP URI in the Remote-Party-ID header field:

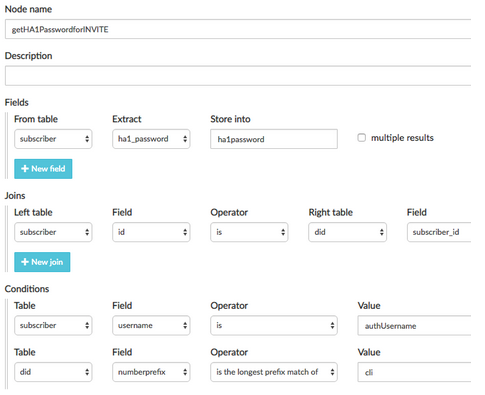
The Database query node can be used to check that the CLI and the authentication username belong to the same subscriber, and to retrieve the subscriber password in a variable.
Appendix 1
Prerequisites
The kamailio-mongodb package must be installed before the configuration described in the next section: it contains the library db_mongodb.so which is mandatory to handle the registration.
In case the user is installing the package on a server without connection to the sw repositories, consider the following dependencies: - libbson - libicu - mongo-c-driver-libs - pgdg-libmongoc
Sample configuration of Kamailio
To support the authentication, the file kamailio.cfg in /etc/kamailio must be edited as in the example below.
# *** To run in debug mode:
#     - define WITH_SREREGISTRAR
#!define WITH_SREREGISTRAR

...
#!ifdef WITH_MONGODB
# - database URL - used to connect to database server by modules such
#       as: auth_db, acc, usrloc, a.s.o.
#!ifndef DBURL
#!define DBURL "mongodb://10.0.12.146,10.0.12.147,10.0.12.148/kamailio?replicaSet=sre_location&slaveOk=true&readPreference=primaryPreferred"
#!endif
#!endif
Where 10.0.12.146,10.0.12.147,10.0.12.148 are 3 IP addresses of the MongoDB cluster of this example.
By default in kamailio the domain is the IP address of the SRE Registrar server, but we can change it by setting the alias parameter in kamailio.cfg:
/* add local domain aliases */
alias="netaxis.be"
Then restart kamailio
[root@sre-reg ~]# service kamailio restartMongoDB installation
Please refer to the appropriate section of the operating system installation guide for instructions on installing MongoDB.
MongoDB replica set configuration
The databases will be stored in /data/sre/location. The name of the replica Set is set to sre_location.
[root@mongodb1 ~]# cat /etc/mongod.conf
# Where and how to store data.
storage:
  dbPath: /data/sre/location
  journal:
    enabled: true
# network interfaces
net:
  port: 27017
  bindIp: 0.0.0.0


#security:

#operationProfiling:

replication:
  replSetName: sre_location
On the three servers, create the directory, change the owner and restart mongod
mkdir -p /data/sre/location
chown mongod.mongod /data/sre/location
service mongod restart
On one server, type “mongo” and then initiate the replicaset
rs.initiate({_id : "sre_location", members: [{ _id: 0, host: "10.0.12.146" },{ _id: 1, host: "10.0.12.147" }, { _id: 2, host: "10.0.12.148" }]})Where 10.0.12.146,10.0.12.147,10.0.12.148 are 3 IP addresses of the MongoDB cluster of this example.
MongoDB replica set configuration with an Arbiter
The databases will be stored in /data/sre/location. The name of the replica Set is set to sre_location. On the two Mongo DB.
[root@mongodb1 ~]# cat /etc/mongod.conf
# Where and how to store data.
storage:
  dbPath: /data/sre/location
  journal:
    enabled: true
# network interfaces
net:
  port: 27017
  bindIp: 0.0.0.0


#security:

#operationProfiling:

replication:
  replSetName: sre_location
On the Arbiter
[root@mongodb3 ~]# cat /etc/mongod.conf
# Where and how to store data.
storage:
  dbPath: /data/sre/arb
  journal:
    enabled: true
# network interfaces
net:
  port: 27017
  bindIp: 0.0.0.0


#security:

#operationProfiling:

replication:
  replSetName: sre_location
On the two mongo DB servers, create the directory, change the owner and restart mongod
mkdir -p /data/sre/location
chown mongod.mongod /data/sre/location
service mongod restart
On one server, type “mongo” and then initiate the replicaset
rs.initiate({_id : "sre_location", members: [{ _id: 0, host: "10.0.12.146" }]})Add a second node on the same server
rs.add({ _id: 1, host: "10.0.12.147" })Then add the arbiter on the same server
rs.addArb("10.0.12.148")Where 10.0.12.146 is the primary server, 10.0.12.147 is the secondary server, and 10.0.12.148 is the arbiter of this example.
INFO
The status of the replication can be verified with the command rs.status() within the mongo interface.
Populating MongoDB
Create the database kamailio, and the collection “version”. Inside the collection “version”, insert a document for each table required by Kamailio: the tables location and location_attrs are required with table_version 9 (with kamailio version 5.x) or 8 (with kamailio version 4.x) and 1 respectively.
Supposing that the configuration is done with kamailio 5.x. the following commands must be issued on the mongo interface of the primary server:
sre_location:PRIMARY> use kamailio
sre_location:PRIMARY> db.createCollection("version")
sre_location:PRIMARY> show collections
version
sre_location:PRIMARY> db.getCollection("version").insert({table_name: "location", table_version: NumberInt(9)})
sre_location:PRIMARY> db.getCollection("version").insert({table_name: "location_attrs", table_version: NumberInt(1)})
Appendix 2
Basic registration Service Logic
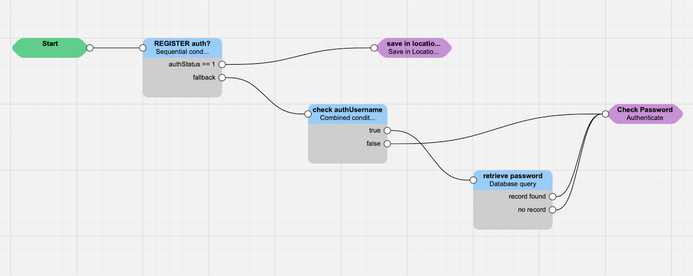
Below the exported version of the service logic (for release 3.2 and higher). To import it, copy/paste it into a text editor, rename the file with the extension slid and import it into SRE service logic editor.
{
	"24": {
		"nodes": {
			"2": {
				"id": 2,
				"name": "save in location services",
				"type": "output.nit.registrar.saveLocationService",
				"description": "",
				"values": {},
				"archived": false,
				"x": 650,
				"y": 100
			},
			"0": {
				"id": 0,
				"name": "Start",
				"type": "enter.start",
				"description": "Start",
				"values": {
					"next": 1
				},
				"archived": false,
				"x": 100,
				"y": 100
			},
			"1": {
				"id": 1,
				"name": "REGISTER auth?",
				"type": "analysis.sequentialConditions",
				"description": "",
				"values": {
					"conditions": [{
						"variable": "authStatus",
						"operator": "is",
						"value": "1",
						"ifTrue": 2
					}],
					"fallback": 3
				},
				"archived": false,
				"x": 300,
				"y": 100
			},
			"3": {
				"id": 3,
				"name": "check authUsername",
				"type": "analysis.condition",
				"description": "",
				"values": {
					"logic": "any",
					"conditions": [{
						"variable": "authUsername",
						"operator": "exists",
						"value": "True"
					}, {
						"variable": "authUsername",
						"operator": "doesNotExist",
						"value": "null"
					}],
					"ifTrue": 5,
					"ifFalse": 4
				},
				"archived": false,
				"x": 550,
				"y": 200
			},
			"4": {
				"id": 4,
				"name": "Check Password",
				"type": "output.nit.registrar.authenticate",
				"description": "",
				"values": {
					"password": "password",
					"ha1": ""
				},
				"archived": false,
				"x": 1000,
				"y": 200
			},
			"5": {
				"id": 5,
				"name": "retrieve password",
				"type": "query.queryDatabaseGeneric",
				"description": "",
				"values": {
					"tables": ["registration.customers"],
					"fields": [{
						"field": "customers.password",
						"storeInto": "password"
					}, {
						"field": "customers.name",
						"storeInto": "customer_name"
					}],
					"joins": [],
					"conditions": [{
						"field": "customers.username",
						"operator": "is",
						"value": "authUsername"
					}],
					"logic": "and",
					"orderBy": [],
					"offset": "",
					"joinType": "JOIN",
					"fetch": "first",
					"storeIntoRecordsList": "",
					"ifRecordFound": 4,
					"ifnoRecordFound": 4,
					"caching": 0
				},
				"archived": false,
				"x": 800,
				"y": 300
			}
		},
		"name": "registration",
		"description": ""
	}
}
Database entry example

Call flow example for REGISTRATION
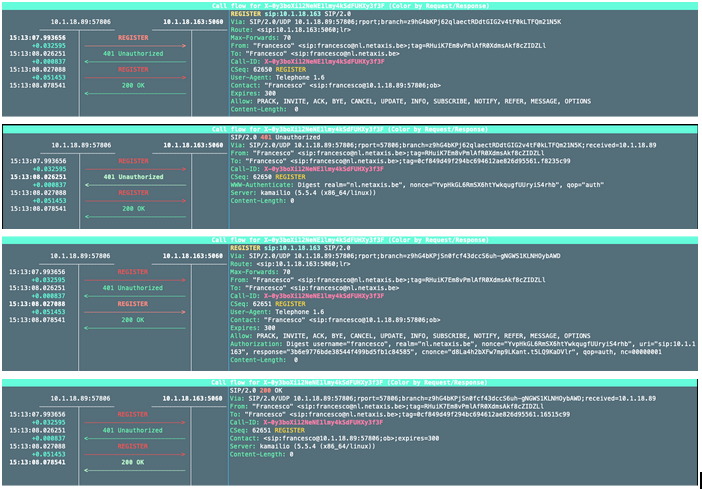
Troubleshooting
MongoDB
By default, Kamailio can manage registrations in-memory on its own. To ensure that Kamailio is properly connected to the MongoDB database and is populating records for persistence, several checks can be performed. By establishing a connection to the MongoDB Kamailio database, it is possible to confirm that Kamailio has created the location table, which stores information about the registered endpoints.
[root@sre4-cp1 ~]# mongo kamailio
MongoDB shell version v5.0.23
connecting to: mongodb://127.0.0.1:27017/kamailio?compressors=disabled&gssapiServiceName=mongodb
Implicit session: session { "id" : UUID("745bc7f5-fac2-4f64-abca-c892fd9ca071") }
MongoDB server version: 5.0.23
...
sre_location:PRIMARY> show collections
location
version
It is also possible to query the location table as follows:
sre_location:SECONDARY> db.location.find()
{ "_id" : ObjectId("654551b634ce7535954f8da1"), "username" : "john", "contact" : "sip:john-kbg8bf86fdlkf@172.18.2.111:5060;transport=tcp", "expires" : ISODate("2024-02-22T08:54:06Z"), "q" : -1, "callid" : "13579672010112023113959@117.114.6.30", "cseq" : 119577, "flags" : 0, "cflags" : 0, "user_agent" : "n/a", "received" : null, "path" : null, "socket" : "tcp:172.16.3.82:5061", "methods" : 7935, "last_modified" : ISODate("2024-02-22T08:49:06Z"), "ruid" : "uloc-649e7b98-3595-2", "instance" : null, "reg_id" : 0, "server_id" : 0, "connection_id" : 776, "keepalive" : 0, "partition" : 0 }
If Kamailio does not populate MongoDB, it may be worth checking the Kamailio logs, which are, by default, located in /var/log/messages. Examine the lines containing "mongodb" to find indications that the Kamailio MongoDB module is initializing and opening connections to the MongoDB URL as configured in kamailio.cfg:
[root@sre4-cp1 ~]# grep mongodb /var/log/messages
...
Feb 21 10:27:40 sre4-cp1 kamailio[2332896]: 0(2332896) DEBUG: <core> [core/sr_module.c:988]: init_mod(): db_mongodb
Feb 21 10:27:40 sre4-cp1 kamailio[2332896]: 0(2332896) DEBUG: db_mongodb [db_mongodb_mod.c:96]: mod_init(): module initializing
...
Feb 21 10:27:42 sre4-cp1 kamailio[2332896]: 0(2332896) DEBUG: db_mongodb [mongodb_connection.c:55]: db_mongodb_new_connection(): connection open to: mongodb://10.1.0.192,10.1.0.193/kamailio?replicaSet=sre_location&readPreference=secondaryPreferred