
Introduction
This technical note provides an overview of the different security mechanisms available on SRE. Procedures are also detailed to further enhance the overall security of the platform.
Standard Security Features
SRE implements several features to expose a secure environment to the external world. While the SRE is typically deployed deep inside the core network and not exposed to the Internet, in some contexts, according to the company internal policies, some of these features may be enabled/configured.
- Web GUI:
- General:
- Possibility to enable HTTPS with the built-in self-signed certificate or any certificate configured
- Possibility to deploy the Web GUI behind a reverse proxy, providing an additional layer of security
- Configurable listen address
- Authentication:
- Built-in Username & password authentication
- Brute-force detection & black-listing
- Configurable password strength
- Alternative LDAP-based authentication
- Alternative OpenID-based authentication
- Authorization:
- Fine-grained access management
- Role-based access rights
- Session management:
- Cookie samesite, httponly & secure mechanisms
- CSRF counter-measures
- Audit log
- General:
- REST API:
- Token-based API authentication
- Username & password authentication
- Audit log
- Database:
- Access rights management
- OS:
- Unprivileged user for processes
Hardening Guide
Host hardening
Enable FIPS mode
Enable fips mode on the host with this command:
# fips-mode-setup --enableAfter commands completes reboot the host. When system is back online run this command to verivy fips mode is configured:
# fips-mode-setup --checkExpected output is FIPS mode is enabled.
WARNING
FIPS mode is incompatible with kamailio tls support. Do not enable it if kamailio is used to terminate sips protocol.
NGINX Reverse Proxy
It is possible to deploy an NGINX reverse proxy in front of SRE to further enhance the security by taking advantage of the NGINX flexibility to limit the TLS ciphers or add security headers on SRE responses.
Main nginx.conf
In order to ensure requests for unknown hostnames are rejected add the following configuration to the main /etc/nginx/nginx.conf file:
    server {
        listen 80 default_server;
        listen [::]:80 default_server;
        server_name _;
        return 404;
    }

    server {
        listen 443 ssl default_server;
        listen [::]:443 ssl default_server;
        server_name _;
        ssl_certificate    /opt/sre/etc/ssl/cert.pem;
        ssl_certificate_key /opt/sre/etc/ssl/privkey.pem;
        return 404;
    }
And comment any server section containing server_name _; in the same file.
SRE specific configuration
Here is a sample /etc/nginx/conf.d/sre-proxy.conf file to set up such proxying. Adapt FQDN to match the GUI FQDN and the proxy_pass directive to the localhost port the process sre-gui listens on.
WARNING
Even if the SRE GUI runs behind an HTTPS reverse proxy, it is recommended to keep the SRE GUI running in HTTPS to have the session cookies managed in advance secure mode.
server {
    listen 80;
    server_name <FQDN>;
    return 301 https://<FQDN>$request_uri;
}

server {
    listen 443 ssl;
    server_name FQDN;
    access_log  /var/log/nginx/sre_access.log;
    error_log  /var/log/nginx/sre_error.log debug;
    ssl_certificate    /opt/sre/etc/cert.pem;
    ssl_certificate_key /opt/sre/etc/privkey.pem;

    ssl_protocols TLSv1.2 TLSv1.3;
    ssl_prefer_server_ciphers on;
    ssl_ciphers "ECDHE-RSA-AES128-GCM-SHA256:ECDHE-ECDSA-AES128-GCM-SHA256:ECDHE-RSA-AES256-GCM-SHA384:ECDHE-ECDSA-AES256-GCM-SHA384:DHE-RSA-AES128-GCM-SHA256:DHE-DSS-AES128-GCM-SHA256:kEDH+AESGCM:ECDHE-RSA-AES128-SHA256:ECDHE-ECDSA-AES128-SHA256:ECDHE-RSA-AES128-SHA:ECDHE-ECDSA-AES128-SHA:ECDHE-RSA-AES256-SHA384:ECDHE-ECDSA-AES256-SHA384:ECDHE-RSA-AES256-SHA:ECDHE-ECDSA-AES256-SHA:DHE-RSA-AES128-SHA256:DHE-RSA-AES128-SHA:DHE-DSS-AES128-SHA256:DHE-RSA-AES256-SHA256:DHE-DSS-AES256-SHA:DHE-RSA-AES256-SHA:!aNULL:!eNULL:!EXPORT:!DES:!RC4:!3DES:!MD5:!PSK";
    ssl_ecdh_curve secp384r1;
    ssl_session_cache shared:SSL:10m;
    ssl_session_tickets off;
    #ssl_stapling on;
    #ssl_stapling_verify on;

    gzip                on;
    gzip_min_length     2000;
    gzip_proxied        expired no-cache no-store private auth;
    gzip_types          *;

    #Version Disclosure in server section
    server_tokens off;

    #Clickjacking: DENY or SAMEORIGIN
    add_header X-Frame-Options "DENY";

    #Limit client body size
    client_max_body_size 100K;

    #enable security-Headers
    add_header X-Content-Type-Options "nosniff";
    add_header Content-Security-Policy "frame-ancestors 'none'";
    add_header Referrer-Policy "no-referrer";
    add_header X-XSS-Protection "1; mode=block";

    #STS
    add_header Strict-Transport-Security "max-age=31536000; includeSubDomains";

    location / {
        proxy_pass   https://localhost:8443;
        proxy_redirect     off;
        proxy_set_header   Host                 $host;
        proxy_set_header   X-Real-IP            $remote_addr;
        proxy_set_header   X-Forwarded-For      $proxy_add_x_forwarded_for;
        proxy_set_header   X-Forwarded-Proto    $scheme;
    }
}
WARNING
client_max_body_size option may impact ability to import large CSV batch data via GUI. If you get 413 Request Entity Too Large consider raising this value.
PostgreSQL Database
Restrict enabled cyphers
Add the following line to main postgresql.conf file located in /var/lib/pgsql/<version>/data/ directory:
ssl_ciphers = 'TLS_AES_256_GCM_SHA384,TLS_AES_128_GCM_SHA256,TLS_AES_128_CCM_SHA256'in order to restrict available ciphers for ssl handshake.
Restrict client access
You should remove all unauthenticated access, and use the following template in /var/lib/pgsql/<version>/data/pg_hba.conf:
# TYPE  DATABASE        USER            ADDRESS                 METHOD
local   all             all                                     peer
host    all             all             127.0.0.1/32            scram-sha-256
host    all             all             ::1/128                 scram-sha-256
host    replication     postgres        ::1/128                 scram-sha-256
host    replication     repmgr          127.0.0.1/32            scram-sha-256
local   repmgr          repmgr                                  peer

# repeat the following three lines for every SRE host.
host    all             sre             <sre ip address>/32          scram-sha-256
host    replication     repmgr          <sre ip address>/32          scram-sha-256
host    repmgr          repmgr          <sre ip address>/32          scram-sha-256
On the master postgres node set a password for repmgr user with:
sudo -u postgres psql
psql (14.7)
Type "help" for help.

postgres=# ALTER ROLE repmgr WITH PASSWORD '<newpassword>';
ALTER ROLE
postgres=# exit
On each host create a /var/lib/pgsql/.pgpass file with the following content (repeat the two lines for every sre host):
<sre ip address>:5432:repmgr:repmgr:<newpassword>
<sre ip address>:5432:replication:repmgr:<newpassword>
Fix permission of file:
chmod 600 /var/lib/pgsql/.pgpass
chown postgres.postgres /var/lib/pgsql/.pgpass
Restart repmgr daemon, for version 14:
systemctl restart repmgr-14for version 17:
systemctl restart repmgr-17SRE user permissions for db creation
By default, the SRE will use the user postgres to perform low-level tasks, such as creating a new database in case of new datamodel creation through the datamodel editor. As local connection with user postgres is not authorized anymore, the solution is to grant the right to create DB to user sre:
postgres=# ALTER USER sre CREATEDB;
ALTER ROLE
And to instruct the SRE to use the another user than the default postgres user, adapt the file /opt/sre/etc/sre.cfg with parameter dme_superuser under section [db] with username:password to use. Example:
[db]
dme_superuser=sre:secretpassword
Backups with pgbackrest
Install postgres repository with the following command:
# for Redhat/Almalinux 8
yum install https://download.postgresql.org/pub/repos/yum/reporpms/EL-8-x86_64/pgdg-redhat-repo-latest.noarch.rpm
# for Redhat/Almalinux 9
yum install https://download.postgresql.org/pub/repos/yum/reporpms/EL-9-x86_64/pgdg-redhat-repo-latest.noarch.rpm
INFO
If internet access is not available, you can manually download pgbackrest packages from netaxis software portal. Packeages are located in directory /SRE/Supporting_packages
Then install pgpackrest tool with:
yum install pgbackrestINFO
Further configuration is needed based on the target backup strategy.
Configure OS user and group with database access
Add a group and user for db access:
groupadd dba
useradd dbuser -G dba
Add a sudo rule to allow dbuser to act as user postgres:
echo '%dba ALL=(postgres) PASSWD: ALL' > /etc/sudoers.d/postgres
chmod 600 /etc/sudoers.d/postgres
OS Firewall Configuration
Here is a sample iptables-save config file that can be loaded with iptables-restore:
*filter
:INPUT ACCEPT [0:0]
:FORWARD ACCEPT [0:0]
:OUTPUT ACCEPT [0:0]
-A INPUT -m state --state ESTABLISHED,RELATED -j ACCEPT
-A INPUT -p icmp -j ACCEPT
-A INPUT -i lo -j ACCEPT

#allow SSH in
-A INPUT -m state --state NEW -m tcp -p tcp --dport 22 -j ACCEPT

#allow ports for GUI (adapt port if GUI listens on another port)
-A INPUT -m state --state NEW -m tcp -p tcp --dport 8080 -j ACCEPT

#REST API, adapt source subnet
-A INPUT -m state --state NEW -m tcp -p tcp --dport 5000 -s 10.0.0.0/16 -j ACCEPT

#in these following directives, adapt the source subnet to cover the different SRE nodes
#PostgreSQL (replication)
-A INPUT -m state --state NEW -m tcp -p tcp --dport 5432 -s 10.0.0.0/16 -j ACCEPT
#MongoDB (service + replication)
-A INPUT -m state --state NEW -m tcp -p tcp --dport 27017 -s 10.0.0.0/16 -j ACCEPT
#logs & stats from any node to EM
-A INPUT -m state --state NEW -m tcp -p tcp --dport 10000 -s 10.0.0.0/16 -j ACCEPT
#acconting events
-A INPUT -m state --state NEW -m tcp -p tcp --dport 10002 -s 10.0.0.0/16 -j ACCEPT
#acconting replication
-A INPUT -m state --state NEW -m tcp -p tcp --dport 10003 -s 10.0.0.0/16 -j ACCEPT

#SIP interface (UDP example), adapt source subnet
-A INPUT -p udp --dport 5060 -s 10.0.0.0/16 -j ACCEPT

#HTTP service logic processor interface, adapt source subnet
-A INPUT -m state --state NEW -m tcp -p tcp --dport 6000 -s 10.0.0.0/16 -j ACCEPT

#ENUM service logic processor, adapt source subnet
-A INPUT -p udp --dport 53 -s 10.0.0.0/16 -j ACCEPT

#reject
-A INPUT -j REJECT --reject-with icmp-host-prohibited
-A FORWARD -j REJECT --reject-with icmp-host-prohibited

COMMIT
Logs Management
It is possible to configure one or more Syslog servers to forward SRE logs to an external system where encryption can be performed at rest and prevent any tampering with the local log files. To do so, head over to the System/Settings/Logging page and set one or more Syslog receivers, as in this screenshot.
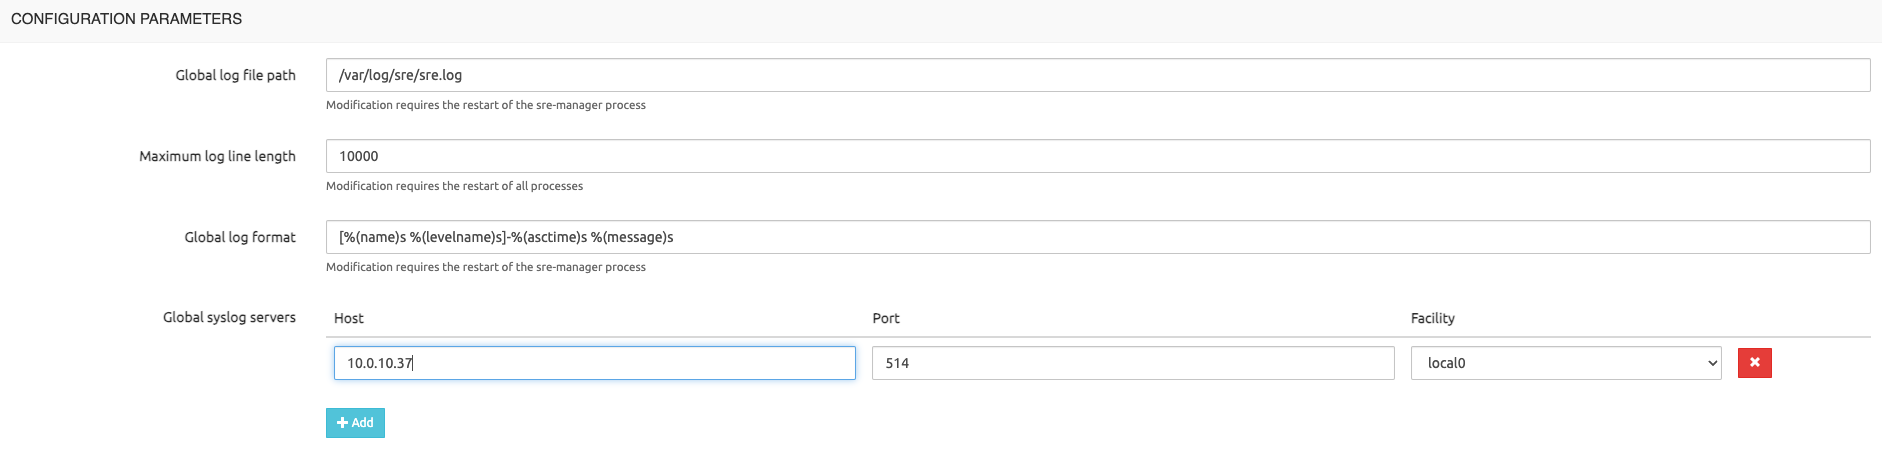
These logs can be forwarded to one or more Syslog receivers:
- Global log
- GUI audit log
- REST API audit log
- Service logic execution log
- Accounting log