Requirements
Please follow the OS installation guide here before installing and configuring SRE.
SRE Installation
Use scp or an sftp client (filezilla) to transfer the file sre*.rpm in the root directory "/".
Then launch the sw installation
sudo dnf install -y https://dl.fedoraproject.org/pub/epel/epel-release-latest-8.noarch.rpm
sudo dnf install -y sre*.rpm
sudo mkdir /data/sre/db
sudo chown sre.sre /data/sre/db
This will take care of installing the dependencies. Once installed, the binaries are located in /opt/sre/bin/.
Passwordless SSH Access for Postgres
passwordless ssh access (via keys) must be configured for user postgres from EM nodes to CPs.
On each EM run these commands (when asked press enter for default settings):
su - postgres
ssh-keygen
On each CP run these commands:
su - postgres
mkdir /var/lib/pgsql/.ssh/
Append then /var/lib/pgsql/.ssh/id_rsa.pub content (taken from EM1 and EM2) to /var/lib/pgsql/.ssh/authorized_keys of all CPs and EMs. If the file does not exist, create it.
From each EM connect to other EM and CPs with:
su - postgres
ssh <target host>
and accept the host key fingerprint.
Primary Element Manager Node Configuration
The procedure in this section should be executed on the Primary Element Manager only.
For the other nodes, we will clone the databases: this is described in "Cloning the Databases" for EM nodes and "Cloning the Database" for CP nodes.
PostgreSQL Configuration
Create Databases
Initialize the cluster and start it:
sudo /usr/pgsql-14/bin/postgresql-14-setup initdb
sudo systemctl start postgresql-14
Log in as postgres and launch the sre-admin command to initialize the database.
su - postgres
/opt/sre/bin/sre-admin db init
Configure the database access
Now edit the configuration file pg_hba.conf in /var/lib/pgsql/14/data.
vi /var/lib/pgsql/14/data/pg_hba.confThis file manages the access rights to the database. It lists all possible origins from where connections can be made to the database and which authentication method should be used.
We will always apply 'trust' as an authentication method which means that we unconditionally trust the specified sources and allow them to connect to the database without any specific verification or authentication.
INFO
For the sake of simplicity access can be granted to an entire range of IP addresses but for security reasons it is sometimes recommended that single hosts should be accepted by using a subnetmask of /32. Nevertheless, we should only accept database connections when using the database user 'sre'.
The config file should look like the following:
# TYPE DATABASE USER ADDRESS METHOD
local all all trust
local replication all trust
host all all 127.0.0.1/32 trust
host all all <local_subnet>/<subnetmask> trust
# IPv6 local connections:
host all all ::1/128 ident
host sre sre <local_subnet>/<subnetmask> trust
host all sre <local_subnet>/<subnetmask> trust
Example:
# TYPE DATABASE USER ADDRESS METHOD
local all all trust
local replication all trust
host all all 127.0.0.1/32 trust
host all all 10.0.11.0/24 trust
# IPv6 local connections:
host all all ::1/128 ident
host sre sre 10.0.11.0/24 trust
host all sre 10.0.11.0/24 trust
In the example configuration file, all the SRE nodes IP addresses are in 10.0.11.0/24 and we enable access to all the services (and thus databases that will be created).
Postgresql.conf tuning
Edit the configuration file postgresql.conf in /var/lib/pgsql/14/data/,
vi /var/lib/pgsql/14/data/postgresql.confuncomment and set the parameter listen_addresses to "*".
Increase the maximum number of connections to 1000:
listen_addresses = '*'
max_connections = 1000
If write-ahead logs are to be used (they are in production environments), adapt the postgresql.conf in /var/lib/pgsql/14/data/ to enable WAL archiving by setting the archive_mode parameter to "on" along with the archive_command. WAL archiving allows continuous archiving of the database cluster, besides backups performed periodically.
Make sure that the destination directory is writable by the user postgres, on all nodes.
The configuration parameters to use for WAL archiving in /data/sre/db/wals/ are:
archive_mode = on
archive_command = 'test ! -f /data/sre/db/wals/%f && cp %p /data/sre/db/wals/%f'
Uncomment and set the following parameters (in this example the system keeps 200 WALS files of 16 MB each):
wal_level = replica
max_wal_senders = 10
wal_keep_size = 3200
Enable hot_standby:
hot_standby = onFor automatic EM switchover add the following configuration settings:
wal_log_hints = on
shared_preload_libraries = 'repmgr'
Restart the Database
Restart postgresql-14 as root:
sudo systemctl restart postgresql-14Verify the Configuration
You can verify database configuration with following commands:
su - postgres
psql
\c sre
\d
\q
exit
Example:
[root@em1 ~]# su - postgres
Last login: Tue Jan 16 09:16:41 CET 2024 on pts/0
[postgres@em1 ~]$ psql
psql (14.7)
Type "help" for help.

postgres=# \c sre
You are now connected to database "sre" as user "postgres".
sre=# \d
                   List of relations
 Schema |            Name            |   Type   | Owner
--------+----------------------------+----------+-------
 public | alarm                      | table    | sre
 public | alarm_id_seq               | sequence | sre
 public | backup                     | table    | sre
 public | backup_id_seq              | sequence | sre
 public | config                     | table    | sre
 public | config_id_seq              | sequence | sre
 public | datamodel                  | table    | sre
 public | datamodel_id_seq           | sequence | sre
 public | datamodel_service          | table    | sre
 public | datamodel_service_id_seq   | sequence | sre
 public | job                        | table    | sre
 public | job_id_seq                 | sequence | sre
 public | node                       | table    | sre
 public | node_pk_seq                | sequence | sre
 public | remote_registration        | table    | sre
 public | remote_registration_id_seq | sequence | sre
 public | service_logic              | table    | sre
 public | service_logic_id_seq       | sequence | sre
 public | service_logic_release      | table    | sre
 public | simulation                 | table    | sre
 public | simulation_group           | table    | sre
 public | simulation_group_id_seq    | sequence | sre
 public | simulation_id_seq          | sequence | sre
 public | sip_agent                  | table    | sre
 public | sip_agent_id_seq           | sequence | sre
 public | user_role                  | table    | sre
 public | user_role_id_seq           | sequence | sre
 public | web_user                   | table    | sre
 public | web_user_id_seq            | sequence | sre
 public | web_user_tokens            | table    | sre
 public | web_user_tokens_id_seq     | sequence | sre
(31 rows)

sre=# \q
[postgres@em1 ~]$ exit
logout
[root@em1 ~]#
Database Replication
Create a user:
su - postgres
createuser -s repmgr
createdb repmgr -O repmgr
exit
Edit the configuration file pg_hba.conf in /var/lib/pgsql/14/data to change access rights for the replication:
sudo vi /var/lib/pgsql/14/data/pg_hba.confAt the end of the file append the following config lines:
local replication repmgr trust
host replication repmgr 127.0.0.1/32 trust
host replication repmgr <ip address of EM1>/32 trust
host replication repmgr <ip address of EM2>/32 trust
host replication repmgr <ip address of CP1>/32 trust
host replication repmgr <ip address of CPn>/32 trust
... repeat for all cps
local repmgr repmgr trust
host repmgr repmgr 127.0.0.1/32 trust
host repmgr repmgr <ip address of EM1>/32 trust
host repmgr repmgr <ip address of EM2>/32 trust
host repmgr repmgr <ip address of CP1>/32 trust
host repmgr repmgr <ip address of CPn>/32 trust
... repeat for all cps
Example assuming 10.0.11.30,10.0.11.31,10.0.11.32,10.0.11.33 are the management addresses of two EMs and two CPs:
...
local replication repmgr trust
host replication repmgr 127.0.0.1/32 trust
host replication repmgr 10.0.11.30/32 trust
host replication repmgr 10.0.11.31/32 trust
host replication repmgr 10.0.11.32/32 trust
host replication repmgr 10.0.11.33/32 trust
local repmgr repmgr trust
host repmgr repmgr 127.0.0.1/32 trust
host repmgr repmgr 10.0.11.30/32 trust
host repmgr repmgr 10.0.11.31/32 trust
host repmgr repmgr 10.0.11.32/32 trust
host repmgr repmgr 10.0.11.33/32 trust
Restart the DB:
sudo systemctl restart postgresql-14Edit the configuration file Postgresql cluster and set the parameters:
sudo vi /etc/repmgr/14/repmgr.conf- node_id = <ID that should be unique in the SRE environment and greater than 0>
- node_name=<name that should be unique in the SRE environment>
- conninfo='host=<IP address of the server, this IP address should be accessible to all other nodes> dbname=repmgr user=repmgr'
- data_directory='/var/lib/pgsql/14/data/'
- ssh_options='-q -o ConnectTimeout=10'
- failover='automatic'
- reconnect_attempts=2
- reconnect_interval=2
- promote_command='/usr/pgsql-14/bin/repmgr standby promote -f /etc/repmgr/14/repmgr.conf --siblings-follow --log-to-file; sudo systemctl restart sre'
- follow_command='/usr/pgsql-14/bin/repmgr standby follow -f /etc/repmgr/14/repmgr.conf --log-to-file --upstream-node-id=%n'
- repmgrd_pid_file='/run/repmgr/repmgrd-14.pid'
- always_promote=true
- service_start_command = 'sudo systemctl start postgresql-14'
- service_stop_command = 'sudo systemctl stop postgresql-14'
- service_restart_command = 'sudo systemctl restart postgresql-14'
- location='dc1'
- priority=100
Example:
node_id=1
node_name='sre40-em1'
conninfo='host=10.0.161.192 dbname=repmgr user=repmgr'
data_directory='/var/lib/pgsql/14/data/'
ssh_options='-q -o ConnectTimeout=10'
failover='automatic'
reconnect_attempts=2
reconnect_interval=2
promote_command='/usr/pgsql-14/bin/repmgr standby promote -f /etc/repmgr/14/repmgr.conf --siblings-follow --log-to-file; sudo systemctl restart sre'
follow_command='/usr/pgsql-14/bin/repmgr standby follow -f /etc/repmgr/14/repmgr.conf --log-to-file --upstream-node-id=%n'
repmgrd_pid_file='/run/repmgr/repmgrd-14.pid'
always_promote=true
service_start_command = 'sudo systemctl start postgresql-14'
service_stop_command = 'sudo systemctl stop postgresql-14'
service_restart_command = 'sudo systemctl restart postgresql-14'
location='dc1'
priority=100
Note that this file will be present on all nodes, with different node, node_name, conninfo and location parameters.
INFO
If SRE is hosted only on one data center, you can put the same location for all nodes.
The conninfo parameter must be valid for any node attempting to connect to this node to replicate data. As such, it should be an IP address reachable by the node itself and the other nodes. It cannot be localhost (127.0.0.1). The dbname and user settings must match the repmgr database name and user previously created.
Register the master on the repmgrDB:
su - postgres
/usr/pgsql-14/bin/repmgr master register
exit
Example:
[root@em1 data]# su - postgres
-bash-4.1$ /usr/pgsql-14/bin/repmgr master register
[2016-04-08 18:08:47] [NOTICE] NOTICE: master node correctly registered for cluster ...
-bash-4.1$
Check that the registration is successful:
su - postgres
psql
\c repmgr
select * from repmgr.nodes;
\q
exit
Example:
[root@em1 ~]# su - postgres
Last login: Tue Jan 16 09:17:46 CET 2024 on pts/0
[postgres@em1 ~]$ psql
psql (14.7)
Type "help" for help.

postgres=# \c repmgr
You are now connected to database "repmgr" as user "postgres".
repmgr=# select * from repmgr.nodes;
 node_id | upstream_node_id | active | node_name  |  type   | location | priority |                  conninfo                   | repluser | slot_name |        config_file
---------+------------------+--------+------------+---------+----------+----------+---------------------------------------------+----------+-----------+----------------------------
       1 |                  | t      | em1        | primary | default  |      100 | host=10.0.161.192 dbname=repmgr user=repmgr | repmgr   |           | /etc/repmgr/14/repmgr.conf

(1 row)

repmgr=# \q
[postgres@em1 ~]$ \exit
logout
[root@em1 ~]#
Repmgrd Start and Enable
Enable repmgrd autorestart with this command:
sudo systemctl edit repmgr-14Then, add:
[Service]
Restart=always

[Unit]
StartLimitIntervalSec=0
Save and exit editor
Enable and start repmgrd for automatic db switchover.
sudo systemctl start repmgr-14
sudo systemctl enable repmgr-14
Configure sre.cfg
Before proceeding with the setup of other nodes, from rel. 3.2 It's necessary to configure the accounting collector_id in the sre config file (/opt/sre/etc/sre.cfg). Make sure you have this line in the master EM:
[accounting]
collector_id=1
LDAP Integration (Optional)
If you need to login to SRE with ldap credentials read the External authentication guide.
Secondary Element Manager Node Configuration
Postgres Configuration
Cloning the Databases
Check that the PostgreSQL cluster is not running:
sudo systemctl stop postgresql-14Ensure that main data directory is empty:
[root@em2 ~]# rm -rf /var/lib/pgsql/14/data/*Edit the configuration file repmgr.conf in /etc/repmgr/14/ set the parameters:
- node_id = <ID that should be unique in the SRE environment and greater than 0>
- node_name=<name that should be unique in the SRE environment>
- conninfo='host=<IP address of the server, this IP address should be accessible to all other nodes> dbname=repmgr user=repmgr'
- data_directory='/var/lib/pgsql/14/data/'
- ssh_options='-q -o ConnectTimeout=10'
- failover='automatic'
- reconnect_attempts=2
- reconnect_interval=2
- promote_command='/usr/pgsql-14/bin/repmgr standby promote -f /etc/repmgr/14/repmgr.conf --siblings-follow --log-to-file; sudo systemctl restart sre'
- follow_command='/usr/pgsql-14/bin/repmgr standby follow -f /etc/repmgr/14/repmgr.conf --log-to-file --upstream-node-id=%n'
- repmgrd_pid_file='/run/repmgr/repmgrd-14.pid'
- always_promote=true
- service_start_command = 'sudo systemctl start postgresql-14'
- service_stop_command = 'sudo systemctl stop postgresql-14'
- service_restart_command = 'sudo systemctl restart postgresql-14'
- location='dc1'
- priority=100
sudo vi /etc/repmgr/14/repmgr.confINFO
if SRE is hosted only on one data center, you can put the same location as the Primary Element Manager.
Connect as user postgres and clone the PostgreSQL data directory files from the master.
This includes the files postgresql.conf and pg_hba.conf in /var/lib/pgsql/14/data.
chown postgres.postgres /data/sre/db/wals
chown postgres.postgres /data/sre/db/backups
su - postgres
/usr/pgsql-14/bin/repmgr -h <IP Master EM> -U repmgr -d repmgr standby clone
exit
Example:
[root@em2 ~]# chown postgres.postgres /data/sre/db/wals
[root@em2 ~]# chown postgres.postgres /data/sre/db/backups
[root@em2 ~]# su - postgres
-bash-4.1$ /usr/pgsql-14/bin/repmgr -h 10.0.11.30 -U repmgr -d repmgr standby clone
[2016-04-11 14:43:09] [NOTICE] Redirecting logging output to '/var/log/repmgr/repmgr-14.log'
Check that the data files were cloned and copied to the correct directories:
du /var/lib/pgsql/14/Example output:
-bash-4.1$ du /var/lib/pgsql/14/
4 /var/lib/pgsql/14/backups
4 /var/lib/pgsql/14/data/pg_twophase
4 /var/lib/pgsql/14/data/pg_notify
12 /var/lib/pgsql/14/data/pg_multixact/members
12 /var/lib/pgsql/14/data/pg_multixact/offsets
28 /var/lib/pgsql/14/data/pg_multixact
4 /var/lib/pgsql/14/data/pg_dynshmem
32 /var/lib/pgsql/14/data/log
568 /var/lib/pgsql/14/data/global
4 /var/lib/pgsql/14/data/pg_serial
120 /var/lib/pgsql/14/data/pg_stat_tmp
4 /var/lib/pgsql/14/data/pg_wal/archive_status
540696 /var/lib/pgsql/14/data/pg_wal
8692 /var/lib/pgsql/14/data/base/16666
8784 /var/lib/pgsql/14/data/base/14486
8928 /var/lib/pgsql/14/data/base/16708
8628 /var/lib/pgsql/14/data/base/14485
8960 /var/lib/pgsql/14/data/base/16707
8952 /var/lib/pgsql/14/data/base/33050
8716 /var/lib/pgsql/14/data/base/16667
8848 /var/lib/pgsql/14/data/base/16683
8628 /var/lib/pgsql/14/data/base/1
8968 /var/lib/pgsql/14/data/base/16682
8812 /var/lib/pgsql/14/data/base/16390
4 /var/lib/pgsql/14/data/base/pgsql_tmp
13008 /var/lib/pgsql/14/data/base/16453
8904 /var/lib/pgsql/14/data/base/33051
118836 /var/lib/pgsql/14/data/base
4 /var/lib/pgsql/14/data/pg_snapshots
4 /var/lib/pgsql/14/data/pg_logical/snapshots
4 /var/lib/pgsql/14/data/pg_logical/mappings
16 /var/lib/pgsql/14/data/pg_logical
4 /var/lib/pgsql/14/data/pg_stat
48 /var/lib/pgsql/14/data/pg_subtrans
4 /var/lib/pgsql/14/data/pg_replslot
4 /var/lib/pgsql/14/data/pg_commit_ts
176 /var/lib/pgsql/14/data/pg_xact
4 /var/lib/pgsql/14/data/pg_tblspc
660640 /var/lib/pgsql/14/data
660652 /var/lib/pgsql/14/
Starting the PostgreSQL Cluster
As root, start PostgreSQL on the Secondary Element Manager
sudo systemctl start postgresql-14Activate the postgresql-14 service at the standard runlevels:
sudo systemctl enable postgresql-14On the Primary Element Manager, we should see that a client tries to connect:
su - postgres
psql
SELECT * FROM pg_stat_replication;
\q
exit
Example:
[root@em1 ~]# su - postgres
Last login: Wed Jan 10 12:19:28 CET 2024 on pts/1
[postgres@sre-40-em1 ~]$ psql
psql (14.7)
Type "help" for help.

postgres=# SELECT * FROM pg_stat_replication;
   pid   | usesysid | usename | application_name | client_addr  | client_hostname | client_port |         backend_start         | backend_xmin |   state   |  sent_lsn  | write_lsn  | flush_lsn  | replay_l
sn | write_lag | flush_lag | replay_lag | sync_priority | sync_state |          reply_time
---------+----------+---------+------------------+--------------+-----------------+-------------+-------------------------------+--------------+-----------+------------+------------+------------+---------
---+-----------+-----------+------------+---------------+------------+-------------------------------
  602994 |    16598 | repmgr  | em2              | 10.0.161.192 |                 |       53532 | 2023-11-14 21:09:18.878107+01 |              | streaming | 1/F03D2D28 | 1/F03D2D28 | 1/F03D2D28 | 1/F03D2D
28 |           |           |            |             0 | async      | 2024-01-16 09:27:41.787695+01

(1 row)

postgres=# \q
[postgres@em1 ~]$ exit
logout
[root@em1 ~]#
Registration
As postgres user, register the standby server:
su - postgres
/usr/pgsql-14/bin/repmgr standby register
Example:
[root@em2 ~]# su - postgres
-bash-4.1$ /usr/pgsql-14/bin/repmgr standby register
[2016-04-11 15:00:27] [NOTICE] Redirecting logging output to '/var/log/repmgr/repmgr-14.log'
Connect to the repmgr database and check that the nodes table now contains two entries. Upstream_node_id column indicates who is master.
su - postgres
psql
\c repmgr
select * from repmgr.nodes;
\q
exit
Example:
[root@em2 ~]# su - postgres
-bash-4.1$ psql
postgres=# \c repmgr
You are now connected to database "repmgr" as user "postgres".
repmgr=# select * from repmgr.nodes;
 node_id | upstream_node_id | active | node_name  |  type   | location | priority |                  conninfo                   | repluser | slot_name |        config_file
---------+------------------+--------+------------+---------+----------+----------+---------------------------------------------+----------+-----------+----------------------------
       1 |                2 | t      | em2        | standby | default  |      100 | host=10.0.161.192 dbname=repmgr user=repmgr | repmgr   |           | /etc/repmgr/14/repmgr.conf
       2 |                  | t      | em1        | primary | default  |      100 | host=10.0.161.193 dbname=repmgr user=repmgr | repmgr   |           | /etc/repmgr/14/repmgr.conf
(2 rows)
repmgr=# \q
[postgres@em2 ~]$ exit
logout
[root@em2 ~]#
Repmgrd Start and Enable
Enable repmgrd autorestart with this command:
sudo systemctl edit repmgr-14Then, add:
[Service]
Restart=always

[Unit]
StartLimitIntervalSec=0

save and exit editor
Save and exit editor
Enable and start repmgrd for automatic db switchover.
sudo systemctl start repmgr-14
sudo systemctl enable repmgr-14
Replication Check
To verify replication is working correctly use the following command:
su - postgres
/usr/pgsql-14/bin/repmgr node check
Example of a good output:
[root@em2 ~]# su - postgres
Last login: Tue Jan 16 09:26:17 CET 2024 on pts/0
[postgres@em2 ~]$
[postgres@em2 ~]$ /usr/pgsql-14/bin/repmgr node check
Node "em2":
	Server role: OK (node is standby)
	Replication lag: OK (0 seconds)
	WAL archiving: OK (0 pending archive ready files)
	Upstream connection: OK (node "em2" (ID: 2) is attached to expected upstream node "em1" (ID: 1))
	Downstream servers: OK (this node has no downstream nodes)
	Replication slots: OK (node has no physical replication slots)
	Missing physical replication slots: OK (node has no missing physical replication slots)
	Configured data directory: OK (configured "data_directory" is "/var/lib/pgsql/14/data")
Configure sre.cfg
Before proceeding with the setup of other nodes, it's necessary to configure the accounting collector_id in the sre config file (/opt/sre/etc/sre.cfg).
Make sure you have this line in the standby EM:
[accounting]
collector_id=2
LDAP Integration (Optional)
If you need to login to SRE with ldap credentials you need to add the authentication section in sre.cfg file, copying the same configuration done for the primary EM.
Call Processor Nodes Configuration
Postgres Configuration
Cloning the Database
Check that the PostgreSQL cluster is not running:
sudo systemctl stop postgresql-14Ensure that postgres data directory is empty:
sudo rm -rf /var/lib/pgsql/14/data/*Edit the configuration file repmgr.conf in /etc/repmgr/14/ and set the parameters:
sudo vi /etc/repmgr/14/repmgr.conf- node = <ID that should be unique in the SRE environment>
- node_name=<name that should be unique in the SRE environment>
- conninfo='host=<IP address of the server, this IP address should be accessible to all other nodes> dbname=repmgr user=repmgr'
- data_directory='/var/lib/pgsql/14/data/'
- location='dc1'
- priority=0
INFO
If SRE is hosted only on one data center, you can put the same location as the one used for Element Managers.
Connect as user postgres and clone the PostgreSQL data directory files from the master EM, using the command repmgr with the parameter -h set to the IP address of the Primary Element Manager PostgreSQL instance.
su - postgres
/usr/pgsql-14/bin/repmgr -h <EM Master IP> -U repmgr -d repmgr standby clone
exit
Example:
[root@cp1 ~]# su - postgres
-bash-4.1$ /usr/pgsql-14/bin/repmgr -h 10.0.12.30 -U repmgr -d repmgr standby clone
[2016-04-11 14:43:09] [NOTICE] Redirecting logging output to '/var/log/repmgr/repmgr-14.log'
[root@cp1 ~]# exit
Check that the data files were cloned and copied to the correct directories
du /var/lib/pgsql/14/Example:
-bash-4.1$ du /var/lib/pgsql/14/
4 /var/lib/pgsql/14/backups
4 /var/lib/pgsql/14/data/pg_twophase
4 /var/lib/pgsql/14/data/pg_notify
12 /var/lib/pgsql/14/data/pg_multixact/members
12 /var/lib/pgsql/14/data/pg_multixact/offsets
28 /var/lib/pgsql/14/data/pg_multixact
4 /var/lib/pgsql/14/data/pg_dynshmem
32 /var/lib/pgsql/14/data/log
568 /var/lib/pgsql/14/data/global
4 /var/lib/pgsql/14/data/pg_serial
120 /var/lib/pgsql/14/data/pg_stat_tmp
4 /var/lib/pgsql/14/data/pg_wal/archive_status
540696 /var/lib/pgsql/14/data/pg_wal
8692 /var/lib/pgsql/14/data/base/16666
8784 /var/lib/pgsql/14/data/base/14486
8928 /var/lib/pgsql/14/data/base/16708
8628 /var/lib/pgsql/14/data/base/14485
8960 /var/lib/pgsql/14/data/base/16707
8952 /var/lib/pgsql/14/data/base/33050
8716 /var/lib/pgsql/14/data/base/16667
8848 /var/lib/pgsql/14/data/base/16683
8628 /var/lib/pgsql/14/data/base/1
8968 /var/lib/pgsql/14/data/base/16682
8812 /var/lib/pgsql/14/data/base/16390
4 /var/lib/pgsql/14/data/base/pgsql_tmp
13008 /var/lib/pgsql/14/data/base/16453
8904 /var/lib/pgsql/14/data/base/33051
118836 /var/lib/pgsql/14/data/base
4 /var/lib/pgsql/14/data/pg_snapshots
4 /var/lib/pgsql/14/data/pg_logical/snapshots
4 /var/lib/pgsql/14/data/pg_logical/mappings
16 /var/lib/pgsql/14/data/pg_logical
4 /var/lib/pgsql/14/data/pg_stat
48 /var/lib/pgsql/14/data/pg_subtrans
4 /var/lib/pgsql/14/data/pg_replslot
4 /var/lib/pgsql/14/data/pg_commit_ts
176 /var/lib/pgsql/14/data/pg_xact
4 /var/lib/pgsql/14/data/pg_tblspc
660640 /var/lib/pgsql/14/data
660652 /var/lib/pgsql/14/
Starting the PostgreSQL Cluster
As root, start PostgreSQL on the Call Processor node
sudo systemctl start postgresql-14Activate the postgresql-14 service at the standard runlevels
sudo systemctl enable postgresql-14On the Primary Element Manager, we should see that the client tries to connect
su - postgres
psql
SELECT * FROM pg_stat_replication;
\q
exit
Example:
[root@em1 ~]# su - postgres
Last login: Wed Jan 10 12:19:28 CET 2024 on pts/1
[postgres@em1 ~]$ psql
psql (14.7)
Type "help" for help.

postgres=# SELECT * FROM pg_stat_replication;
   pid   | usesysid | usename | application_name | client_addr  | client_hostname | client_port |         backend_start         | backend_xmin |   state   |  sent_lsn  | write_lsn  | flush_lsn  | replay_l
sn | write_lag | flush_lag | replay_lag | sync_priority | sync_state |          reply_time
---------+----------+---------+------------------+--------------+-----------------+-------------+-------------------------------+--------------+-----------+------------+------------+------------+---------
---+-----------+-----------+------------+---------------+------------+-------------------------------
  602994 |    16598 | repmgr  | em2        | 10.0.161.192 |                 |       53532 | 2023-11-14 21:09:18.878107+01 |              | streaming | 1/F03D2D28 | 1/F03D2D28 | 1/F03D2D28 | 1/F03D2D
28 |           |           |            |             0 | async      | 2024-01-16 09:27:41.787695+01
 3641373 |    16598 | repmgr  | cp1              | 10.0.161.194 |                 |       47672 | 2023-12-18 13:57:19.167726+01 |              | streaming | 1/F03D2D28 | 1/F03D2D28 | 1/F03D2D28 | 1/F03D2D
28 |           |           |            |             0 | async      | 2024-01-16 09:27:41.745955+01
(2 rows)
repmgr=# \q
[postgres@em1 ~]$ exit
logout
Registration
As postgres user, register the standby server (all standby servers)
su - postgres
/usr/pgsql-14/bin/repmgr standby register
exit
Example:
[root@cp1 ~]# su - postgres
Last login: Wed Jan 10 12:19:28 CET 2024 on pts/1
[postgres@cp1 ~]$ /usr/pgsql-14/bin/repmgr standby register
INFO: connecting to local node "cp1" (ID: 3)
INFO: connecting to primary database
WARNING: --upstream-node-id not supplied, assuming upstream node is primary (node ID: 1)
INFO: standby registration complete
NOTICE: standby node "cp1" (ID: 3) successfully registered
Connect to the repmgr database and check that the nodes table now contains the entry for the call processor node
su - postgres
psql
\c repmgr
select * from repmgr.nodes;
\q
exit
Example:
[root@cp1 ~]# su - postgres
Last login: Tue Jan 16 09:27:39 CET 2024 on pts/0
[postgres@cp1 ~]$ psql
psql (14.7)
Type "help" for help.

postgres=# \c repmgr
You are now connected to database "repmgr" as user "postgres".
repmgr=# select * from repmgr.nodes;
 node_id | upstream_node_id | active | node_name  |  type   | location | priority |                  conninfo                   | repluser | slot_name |        config_file
---------+------------------+--------+------------+---------+----------+----------+---------------------------------------------+----------+-----------+----------------------------
       3 |                2 | t      | cp1        | standby | default  |        0 | host=10.0.161.194 dbname=repmgr user=repmgr | repmgr   |           | /etc/repmgr/14/repmgr.conf
       1 |                2 | t      | em1        | standby | default  |      100 | host=10.0.161.192 dbname=repmgr user=repmgr | repmgr   |           | /etc/repmgr/14/repmgr.conf
       2 |                  | t      | em2        | primary | default  |      100 | host=10.0.161.193 dbname=repmgr user=repmgr | repmgr   |           | /etc/repmgr/14/repmgr.conf
(3 rows)

repmgr=# \q
[postgres@cp1 ~]$ exit
Repmgrd start and enable
Enable repmgrd autorestart with this command:
sudo systemctl edit repmgr-14

add:

[Service]
Restart=always

[Unit]
StartLimitIntervalSec=0

save and exit editor
Enable and start repmgrd for automatic db switchover.
sudo systemctl start repmgr-14
sudo systemctl enable repmgr-14
Replication Check
To verify replication is working correctly use the following command:
[root@cp1 ~]# su - postgres
Last login: Tue Jan 16 09:38:10 CET 2024 on pts/0
[postgres@cp1 ~]$ /usr/pgsql-14/bin/repmgr node check
Node "cp1":
	Server role: OK (node is standby)
	Replication lag: OK (0 seconds)
	WAL archiving: OK (0 pending archive ready files)
	Upstream connection: OK (node "cp1" (ID: 3) is attached to expected upstream node "em1" (ID: 1))
	Downstream servers: OK (this node has no downstream nodes)
	Replication slots: OK (node has no physical replication slots)
	Missing physical replication slots: OK (node has no missing physical replication slots)
	Configured data directory: OK (configured "data_directory" is "/var/lib/pgsql/14/data")
[postgres@cp1 ~]$ logout
Kamailio Configuration
Replace the kamailio configuration file /etc/kamailio/kamailio.cfg by the one provided with the sre software (in /opt/sre/etc/kamailio), start Kamailio and activate it permanently after reboot
sudo cp /opt/sre/etc/kamailio/kamailio.cfg /etc/kamailio/
sudo chmod 644 /etc/kamailio/kamailio.cfg
sudo systemctl enable kamailio
sudo systemctl start kamailio
Once kamailio is installed, in some implementations setting up a cluster of sip resources is required. For this part of configuration please refer to your Netaxis reference contact.
Dialog List Kamailio (Optional)
To use system->calls monitoring feature in the gui modify kamailio configuration file with the following command, replacing <kamailio address> with the correct address:
sudo sed -i s/tcp:127.0.0.1:8090/tcp:<kamailio address>:8090/ /etc/kamailio/kamailio.cfg
sudo systemctl restart kamailio
Hitless Upgrade for Minor Releases (Optional)
SRE 4.0 enables the redirection of traffic from one call processor to another, offering a practical means to upgrade SRE with minimal disruption to ongoing traffic. To implement traffic redirection, it is essential that port 5555 remains unblocked between the hosts.
To configure SRE to listen to port 5555 on all addresses edit /opt/sre/etc/sre.cfg and add the broker_listen_address setting under the section kamailio:
[kamailio]
broker_listen_address=tcp://0.0.0.0:5555
Starting the SRE
Element Manager Nodes
The software deployed on the element manager nodes is the same as the one deployed on the call process nodes. Nevertheless, the element manager node will have different processes running than the call processing nodes. The file /opt/sre/etc/supervisord-programs.conf determines which processes must be started and will determine as such whether a node will act as 'call processor', 'element manager' or both.
For an Element Manager node, the parameter autostart should be set to true in the following sections:
- [program:sre-manager]
- [program:sre-gui]
- [program:sre-REST]
- [program:sre-health-monitor]
- [program:sre-cdr-collector]
- [program:sre-cdr-postprocessor]
- [program:sre-scheduler]
- [program:telegraf]
sudo vi /opt/sre/etc/supervisord-programs.confRun this command to set permission of /data/sre/db directory:
chown sre.sre /data/sre/db/Activate the service that will start the sre processes selected above:
sudo systemctl enable sre
sudo systemctl start sre
To check that the service is active run:
systemctl status sreSample output:
[root@em1 ~]# systemctl status sre
* sre.service - SRE is a centralized, multi interface Session Routing Engine.
   Loaded: loaded (/usr/lib/systemd/system/sre.service; enabled; vendor preset: disabled)
   Active: active (running) since Mon 2024-01-15 11:33:40 CET; 23h ago
     Docs: https://www.netaxis.be/products/session-routing-engine/
  Process: 3349169 ExecStop=/opt/sre/bin/supervisorctl shutdown (code=exited, status=0/SUCCESS)
 Main PID: 3349259 (supervisord)
    Tasks: 102 (limit: 23129)
   Memory: 1.6G
   CGroup: /system.slice/sre.service
           |-3349259 /opt/sre/bin/python /opt/sre/bin/supervisord -n
           |-3349283 /opt/sre/bin/python /opt/sre/bin/sre-REST
           |-3349284 /opt/sre/bin/python /opt/sre/bin/sre-cdr-collector
           |-3349285 /opt/sre/bin/python /opt/sre/bin/sre-cdr-postprocessor
           |-3349286 /opt/sre/bin/python /opt/sre/bin/sre-gui
           |-3349287 /opt/sre/bin/python /opt/sre/bin/sre-health-monitor
           |-3349289 /opt/sre/bin/python /opt/sre/bin/sre-scheduler
           |-3349290 telegraf --config /opt/sre/etc/telegraf.conf
           `-3570138 /opt/sre/bin/python /opt/sre/bin/sre-manager
...
The web portal of the Element Manager is available on
http://<IP address of EM>:8080/dashboard
Default login and password are: admin / orval
On the web portal, in System -> Settings, under the tab Element Managers, you must indicate the IP addresses of the Primary and Secondary Element Managers:
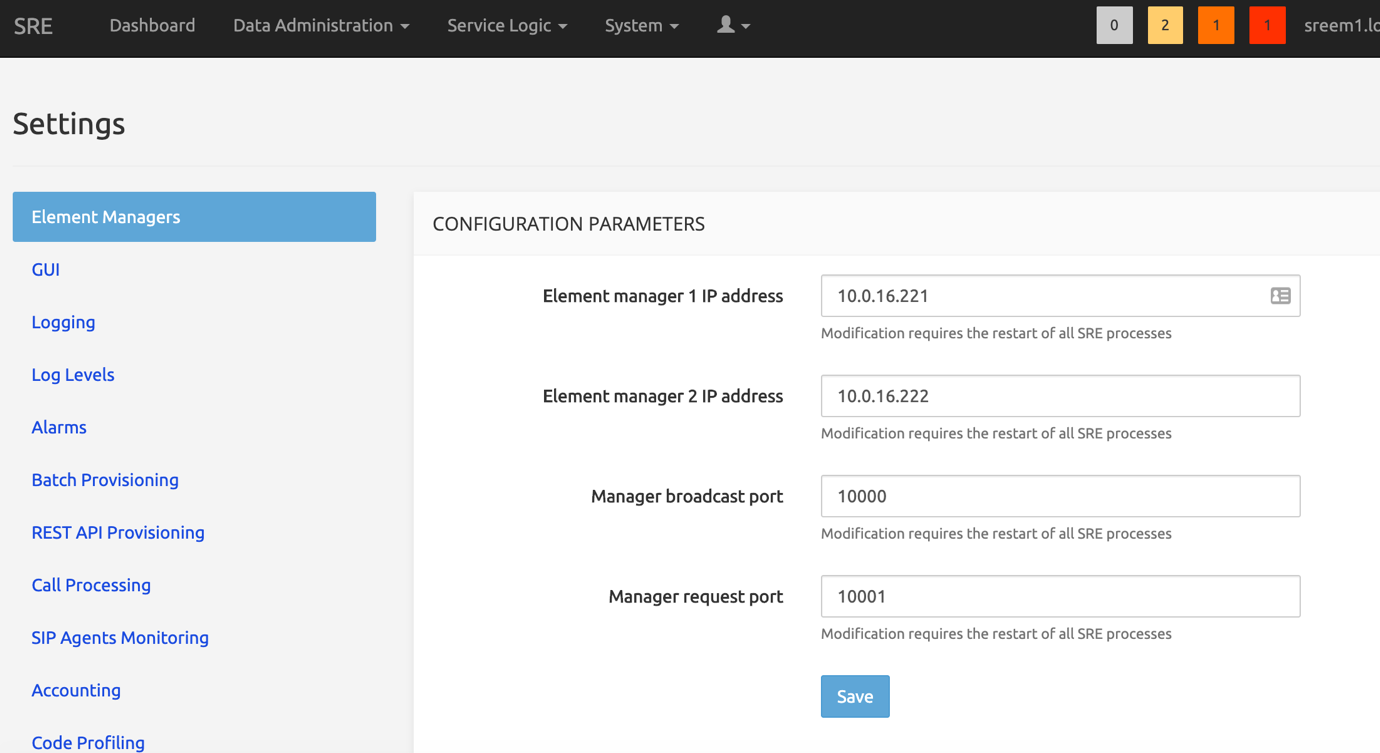
In settings->element managers set:
Stats DB token to my-super-secret-token (or the token chosen for influxdb)
Stats DB org to influxorg
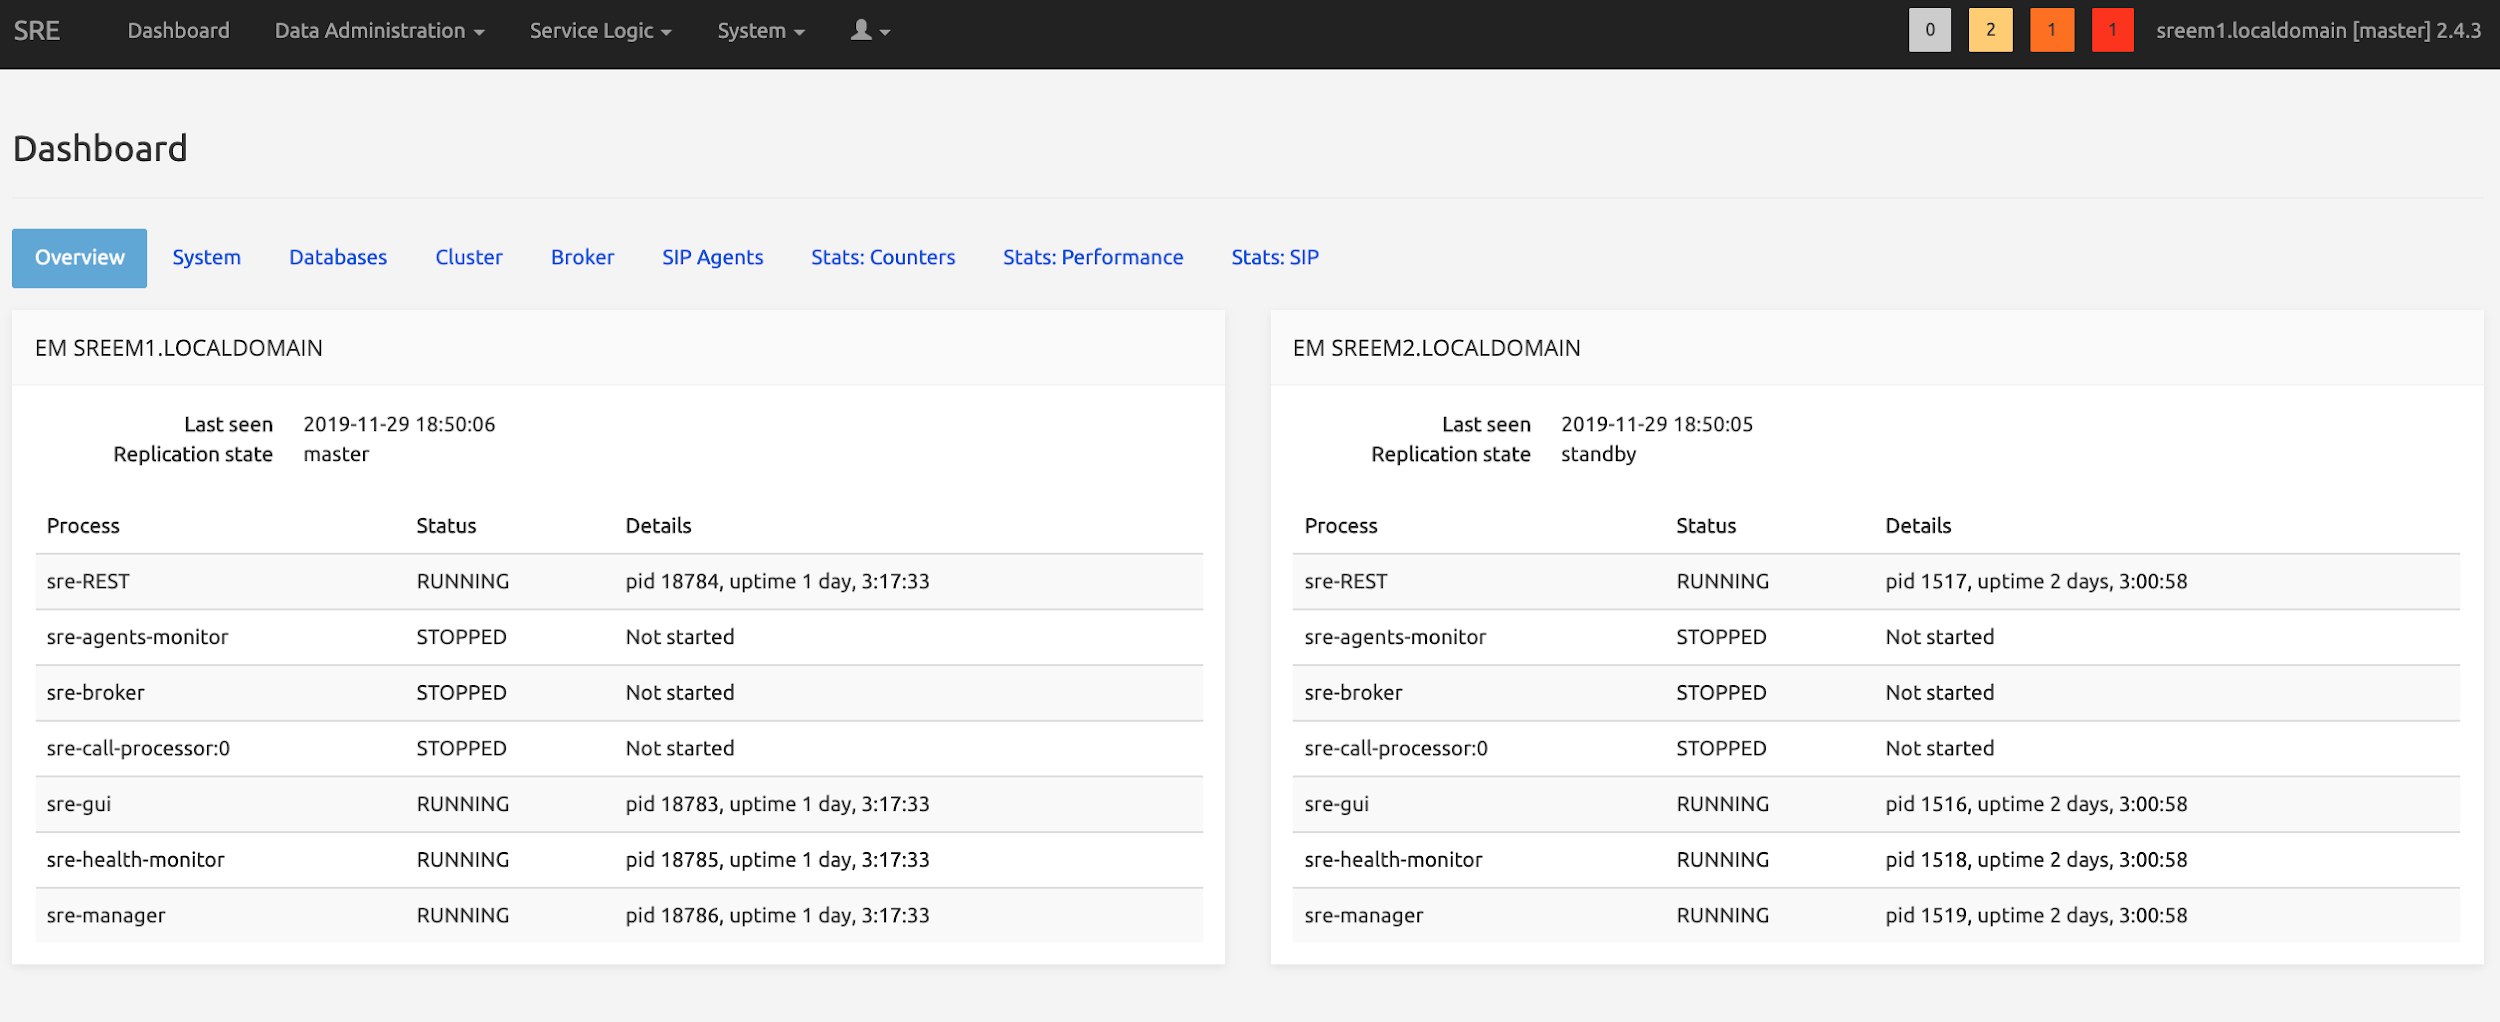
Then restart all the SRE processes on the Primary and the Secondary Element Manager
sudo systemctl restart sreAfter the restart, the dashboard shows the status of both Element Managers.
Call Processor Nodes
The file /opt/sre/etc/supervisord-programs.conf should be updated on each Call Processor in order to start the processes sre-broker, sre-health-monitor, sre-agents-monitor and as many sre-call-processor as there are vCPUs.
On each Call Processor, the parameter autostart should be set to true in the following sections:
- [program:sre-call-processor]
- [program:sre-health-monitor]
- [program:sre-agents-monitor]
- [program:sre-broker]
- [program:sre-cdr-sender]
- [program:sre-scheduler]
- [program:telegraf]
- [program:sre-enum-processor] (if used)
- [program:sre-http-processor] (if used)
- [program:sre-sre-remote-registration] (if used)
Update the value of numprocs in the section [program:sre-call-processor] with the number of vCPUs.
sudo vi /opt/sre/etc/supervisord-programs.confActivate the service that will start the sre processes selected above:
sudo systemctl enable sre
sudo systemctl start sre
To check that the service is active run:
systemctl status sreSample output:
[root@cp1 ~]# systemctl status sre
● sre.service - SRE is a centralized, multi interface Session Routing Engine.
   Loaded: loaded (/usr/lib/systemd/system/sre.service; enabled; vendor preset: disabled)
   Active: active (running) since Mon 2024-01-15 11:33:26 CET; 23h ago
     Docs: https://www.netaxis.be/products/session-routing-engine/
  Process: 3242150 ExecStop=/opt/sre/bin/supervisorctl shutdown (code=exited, status=0/SUCCESS)
 Main PID: 3242227 (supervisord)
    Tasks: 198 (limit: 23632)
   Memory: 1.0G
   CGroup: /system.slice/sre.service
           ├─3242227 /opt/sre/bin/python /opt/sre/bin/supervisord -n
           ├─3242248 /opt/sre/bin/python /opt/sre/bin/sre-agents-monitor
           ├─3242249 sre-broker
           ├─3242250 /opt/sre/bin/python /opt/sre/bin/sre-call-processor 0
           ├─3242251 /opt/sre/bin/python /opt/sre/bin/sre-cdr-sender
           ├─3242252 /opt/sre/bin/python /opt/sre/bin/sre-enum-processor
           ├─3242253 /opt/sre/bin/python /opt/sre/bin/sre-health-monitor
           ├─3242254 /opt/sre/bin/python /opt/sre/bin/sre-http-processor
           ├─3242255 /opt/sre/bin/python /opt/sre/bin/sre-remote-registration
           ├─3242256 /opt/sre/bin/python /opt/sre/bin/sre-scheduler
           └─3242257 telegraf --config /opt/sre/etc/telegraf.conf
...
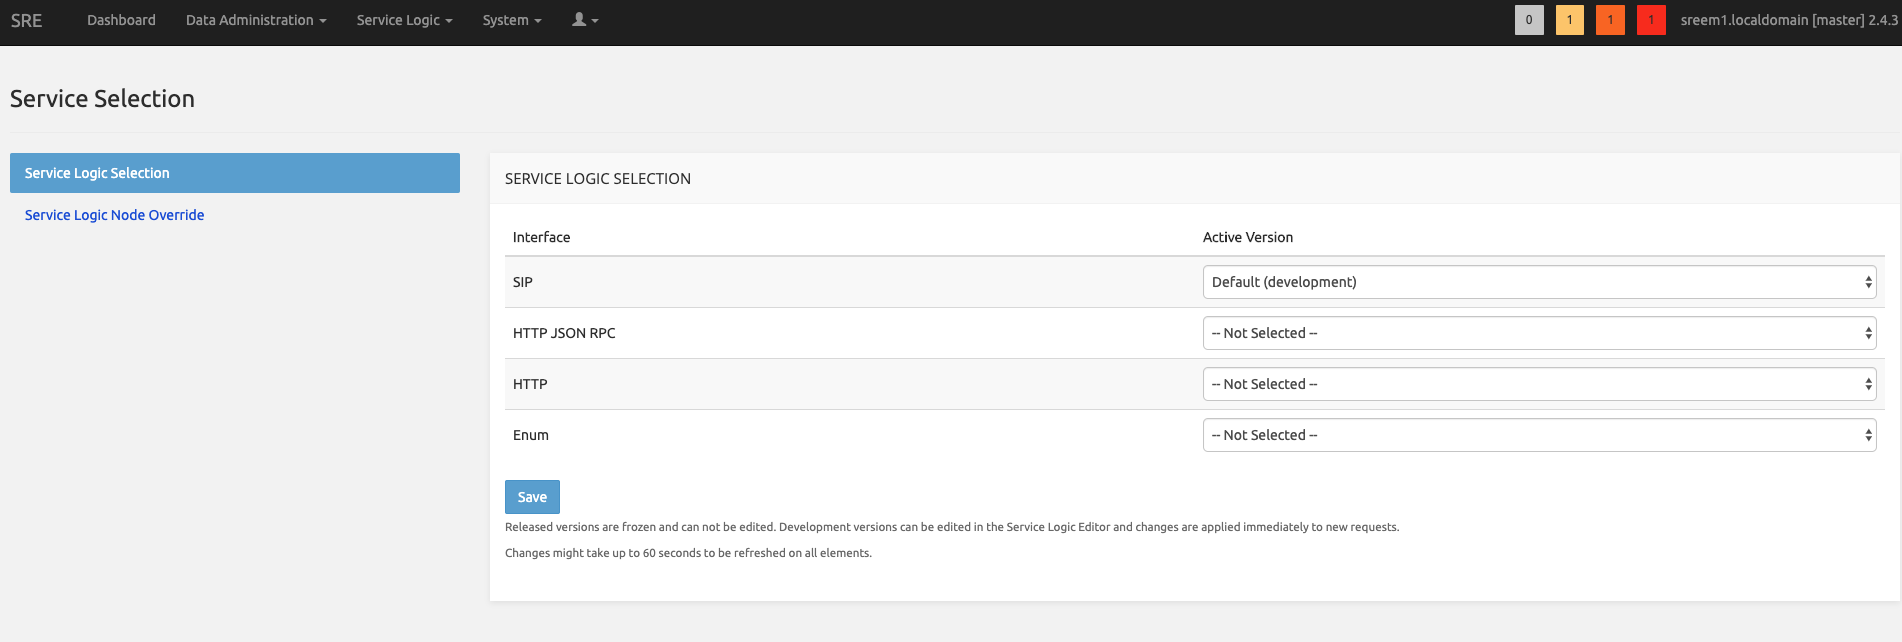
In order to properly show all the dashboard tabs correctly, on the SRE GUI, go to Service Logic -- Service Logic Editor and create a service logic (this can be empty).

And in Service Logic -- Service Selection, on the sip interface setup the service logic created.
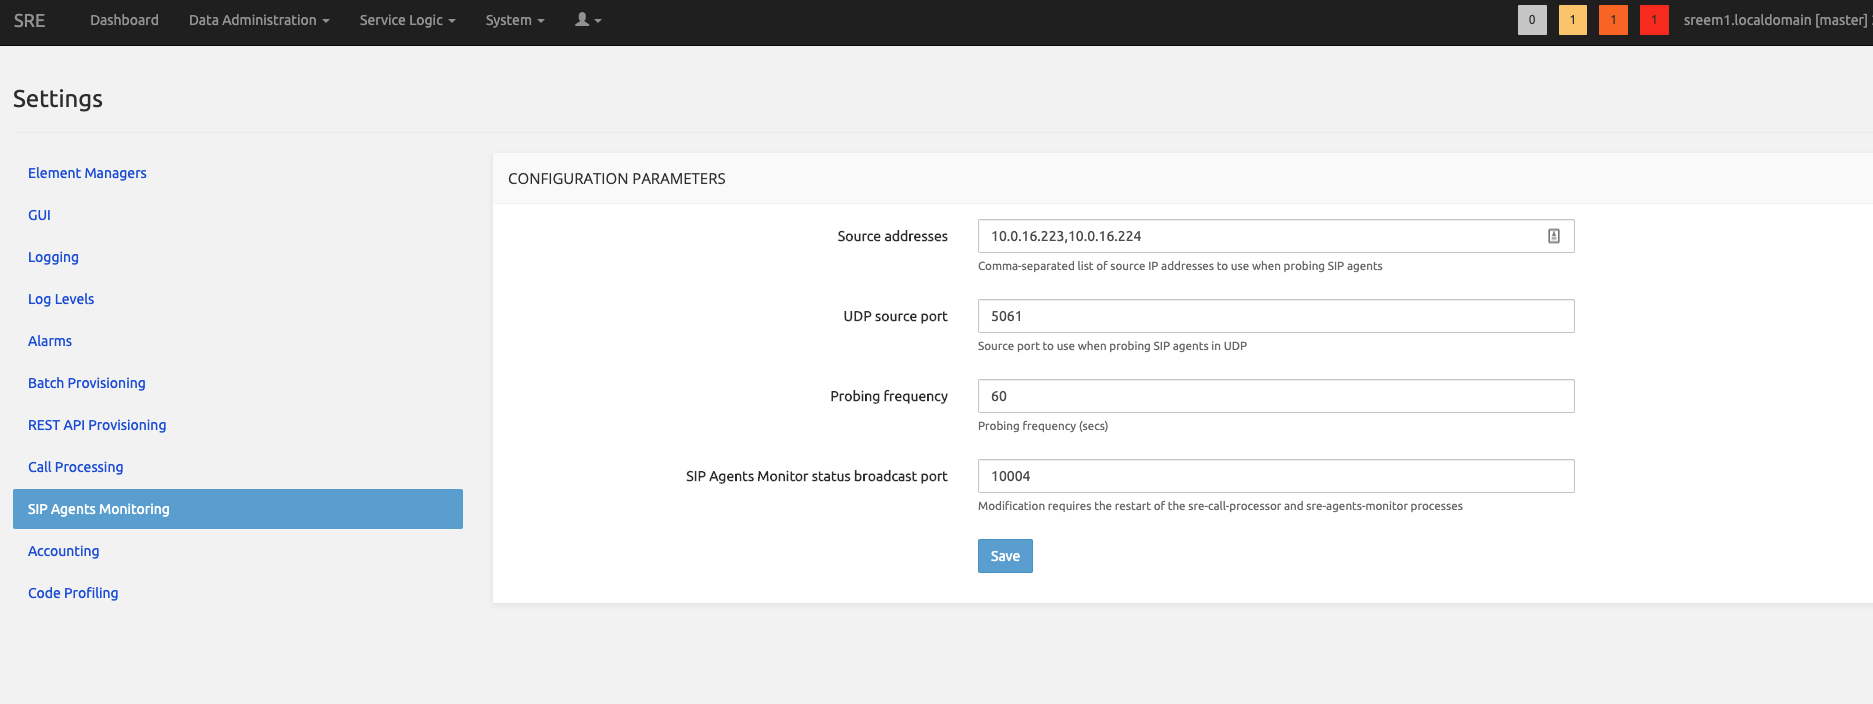
When done, go to System -- Settings -- SIP Agents Monitoring.
In Source addresses, type the IP Addresses of all the Call Processors in comma separated format.
On all call processors, restart the SRE service
sudo systemctl restart sreThe web interface of the Element Manager is updated accordingly.
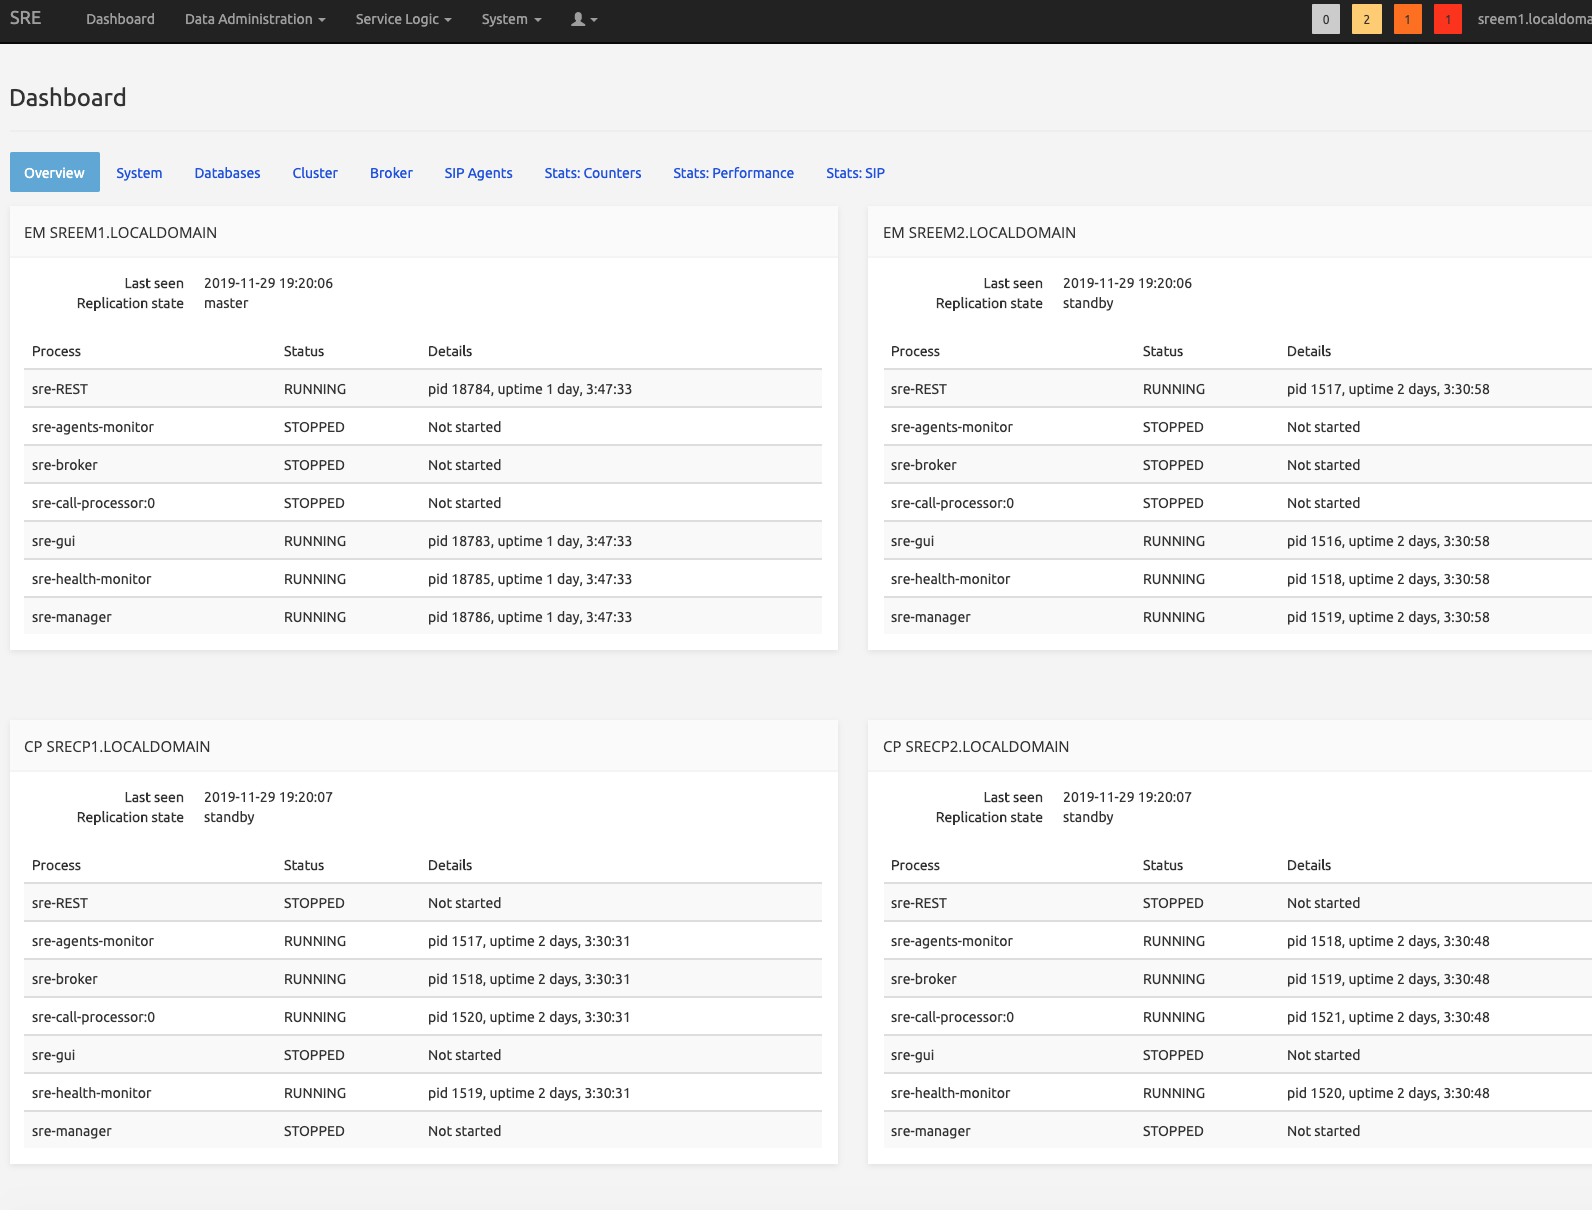
Configuring Call Admission Control (Optional)
Call Admission Control is using a MongoDB instance, different than the general PostgreSQL instance of the SRE Core. The following setup procedure assumes that the servers have an internet connection to reach the relevant repositories. If this is not applicable, the installation will require local rpm installation.
The number of nodes for MongoDB must be an odd number (N+1) to minimize the possibility for an outage of CAC. Indeed, if less than N/2 nodes (example 1 node out of 3) are unavailable, there is still a quorum (majority of nodes) therefore a PRIMARY node is available and the CAC feature is generally available. The following procedure assumes 3 MongoDB nodes but can be generalized to any N+1 setup. The shown IP addresses are examples and must be replaced by your actual IP addresses.
Initial Steps
On all servers dedicated to Mongo DB (preferably 3 including the Arbiter), execute one of the following procedures.
It's recommended to have an odd number of server for replication. This can be achieved with and odd number of CP all running mongo server or by adding an arbiter to an additional server (Standy EM can be selected for this purpose)..
Alternative 1. MongoDB replica set configuration (without Arbiter)
The databases will be stored in /data/sre/location. The name of the replica Set is set to sre_location
[root@mongodb1 ~]# cat /etc/mongod.conf
...
storage:
  dbPath: /data/sre/location
  journal:
    enabled: true
...
  net:
    port: 27017
    bindIp: 0.0.0.0
...
replication:
  replSetName: sre_location
...
On the three servers, create the directory, change the owner and restart mongod.
sudo mkdir -p /data/sre/location
sudo chown mongod.mongod /data/sre/location
sudo systemctl restart mongod
On one server, type "mongo" and then initiate the replicaset
rs.initiate({_id : "sre_location", members: [{ _id: 0, host: "10.0.12.146" },{ _id: 1, host: "10.0.12.147" }, { _id: 2, host: "10.0.12.148\" }]})Alternative 2. MongoDB replica set configuration with an Arbiter
The databases will be stored in /data/sre/location. The name of the replica Set is set to sre_location.
On the two Mongo DB:
[root@mongodb1 ~]# cat /etc/mongod.conf
...
storage:
  dbPath: /data/sre/location
  journal:
    enabled: true
...
  net:
    port: 27017
    bindIp: 0.0.0.0
...
replication:
  replSetName: sre_location
...
On the Arbiter:
[root@mongodb3 ~]# cat /etc/mongod.conf
...
storage:
  dbPath: /data/sre/arb
  journal:
    enabled: true
...
  net:
    port: 27017
    bindIp: 0.0.0.0
...
replication:
  replSetName: sre_location
...
On the two mongo DB servers, create the directory, change the owner and restart mongod
sudo mkdir -p /data/sre/location
sudo chown mongod.mongod /data/sre/location
sudo systemctl restart mongod
On the Arbiter, create the directory, change the owner and restart mongod
sudo mkdir -p /data/sre/arb
sudo chown mongod.mongod /data/sre/arb
sudo systemctl restart mongod
Next steps
On the main server, type
mongoand then initiate the replicaset
> rs.initiate({_id : "sre_location", members: [{_id: 0, host: "10.0.12.146" }]})Add a second node on the same server
sre_location:PRIMARY> rs.add({_id: 1, host: "10.0.12.147" })Then add the arbiter (in case an arbiter is defined)
sre_location:PRIMARY> rs.addArb("10.0.12.148")Then check where is the PRIMARY node located with:
sre_location:PRIMARY> rs.status()Connect to primary node and on that node launch mongo cli and insert the following command:
sre_location:PRIMARY> db.adminCommand({"setDefaultRWConcern" : 1,"defaultWriteConcern" : {"w" : 1}})Post-installation: useful commands to check the DB status
For showing the replica set information
sre_location:PRIMARY> rs.status()If you want to read data on a secondary node using mongo shell, use
sre_location:SECONDARY> rs.secondaryOk()
sre_location:SECONDARY> rs.status()
To display the databases:
sre_location:PRIMARY> show dbs
admin                   0.000GB
call_admission_control  0.000GB
config                  0.000GB
local                   0.078GB
To remove a node from the cluster, from the PRIMARY node:
sre_location:PRIMARY> rs.remove("<IP>:27017")SRE configuration
Modify SRE configuration on all SRE nodes (/opt/sre/etc/sre.cfg) by adding the addresses of the mongo instances
[db]
cac_db_uri=mongodb://<address1>,<address2>,<address3>/call_admission_control?replicaSet=sre_location&readPreference=secondaryPreferred&serverSelectionTimeoutMS=1000&socketTimeoutMS=500&connectTimeoutMS=500
cac_db_name=call_admission_control
(it's better to remove all the existing comments (starting with ; ) otherwise you can end up in cac silently not working. )
Then restart the SRE service (all CP nodes, or all CP nodes that must use CAC).
Then enter
mongoin the PRIMARY node and add the call_admission_control DB
sre_location:PRIMARY> use call_admission_controlA new "show dbs" will confirm that "call_admission_control" is in the list:
sre_location:PRIMARY> show dbs
call_admission_control 0.078GB
local 1.078GB
Useful commands to check the DB status
To check if calls are registered, please do on the PRIMARY node:
# mongo
sre_location:PRIMARY> use call_admission_control
switched to db call_admission_control
sre_location:PRIMARY> db.active_calls.count()
3
This command returns the total number of calls registered for CAC.
Or:
# mongo
sre_location:PRIMARY> use call_admission_control
switched to db call_admission_control
sre_location:PRIMARY> db.active_calls.find()
...
You'll see here all the registered calls, with their Aggregation Id and Call Id
With the command /opt/sre/bin/sre-admin cac the administrator can check the current status of the aggregation_ids or execute some basic operations:
[root@cp1 ~]# /opt/sre/bin/sre-admin cac
Usage: sre-admin cac [OPTIONS] COMMAND [ARGS]...

  Call admission control

Options:
  --help  Show this message and exit.

Commands:
  drop-all         Drop all records from the CAC backend
  get-count        Get subscriber calls counts
  get-subscribers  Get all subscribers
  register-call    Manually register a call by providing the subscriber...
  remove-call-id   Manually remove a call id from the CAC backend and...
Examples:
- get-subscribers option is giving the list of aggregations currently in use, and the values for incoming and outgoing calls. Pay attention to the warning about the performance.
Sample output:
[root@sre-40-cp1 ~]# /opt/sre/bin/sre-admin cac get-subscribers
Retrieving all subscribers may impact performance on production systems. Do you want to continue? [y/N]: y
Aggregation id      In    Out    Total
----------------  ----  -----  -------
pbx                  1      0        1
Total                1      0        1
[root@sre-40-cp1 ~]#- get-count option is giving the values for incoming and outgoing calls for a given aggregation-id
[root@sre-40-cp1 ~]# /opt/sre/bin/sre-admin cac get-count pbx
Aggregation id      In    Out    Total
----------------  ----  -----  -------
pbx 1 0 1- register-call is to simulate the registration of a call without really placing the call. It requires a aggregation-id, a call-id and the direction (in/out)
[root@cp1 ~]# /opt/sre/bin/sre-admin cac register-call pbx 123 in
Registering call... done- remove-call-id is to remove a call from CAC using the call-id as parameter. Mainly used after having registered a simulated call with the previous command
[root@cp1 ~]# /opt/sre/bin/sre-admin cac remove-call-id 123
Removing call id... done
[root@cp1 ~]#- drop-all is to remove all the calls from CAC
[root@cp1 ~]# /opt/sre/bin/sre-admin cac drop-all
Dropping all records will reset all counters to 0. Do you want to continue? [y/N]: y
Dropping all records... done in 0.064 secs
[root@cp1 ~]#
Installing and configuring centralized logging (Optional)
Element Manager Node configuration
Edit /etc/graylog/server/server.conf, set root_password_sha2 with this content:
echo -n "Enter Password: " && head -1 </dev/stdin | tr -d '\n' | sha256sum | cut -d" " -f1Edit /etc/graylog/server/server.conf, set password_secret with this content:
< /dev/urandom tr -dc A-Z-a-z-0-9 | head -c${1:-96};echo;Edit /etc/graylog/server/server.conf, set http_bind_address with this content:
<ip management address>:9000Create rsyslog and logrotate configuration file using the commands below:
[root@em1 /root]# cat > /etc/rsyslog.d/remlisten.conf << EOF
\$ModLoad imtcp
\$InputTCPServerRun 514
\$template DynFile,"/var/log/system-%HOSTNAME%.log"
*.*;authpriv.none;auth.none;security.none -?DynFile
EOF
[root@em1 /root]# cat > /etc/logrotate.d/remotelog << EOF
/var/log/system-*.log
{
        rotate 5
        daily
        dateext
        missingok
        notifempty
        delaycompress
        compress
        postrotate
                invoke-rc.d rsyslog rotate > /dev/null
        endscript
}
EOF
Restart rsyslog:
sudo systemctl restart rsyslogCall Processor Node configuration
Edit /opt/sre/etc/supervisord-programs.conf comment out all log file settings with ";" and add to each program section:
stdout_syslog=true
stderr_syslog=true
Edit /opt/sre/etc/sre.cfg in section kamailio add log_filename setting with value syslog:
[kamailio]
log_filename=syslog
Restart sre:
sudo systemctl restart sreEdit /etc/systemd/journald.conf, uncomment the RateLimitBurst line and set it to 0.
Restart systemd-journald using the command below:
sudo systemctl restart systemd-journaldEdit /etc/rsyslog.conf and add before last line:
*.* @@<address of em1>:514
*.* @@<address of em2>:514
restart rsyslog:
sudo systemctl restart rsyslogInstalling a Standalone SRE
For a standalone environment (for example a simple lab environment), we can install Element Manager and Call Processor on the same machine.
Please follow the OS installation guide here before installing and configuring SRE.
Then you install the Primary Element Manager as shown in Primary Element Manager Node Configuration. with the following differences:
- For the database access, you only have to mention the IP address of the local machine because there won't be any other nodes.
- In the postgresql.conf file, keep hot_standby = off
- you can skip database replication and the setup of the repmgr config file.
Then, on the same machine, you follow the steps for the Call Processor installation as mentioned in Call Processor Nodes Configuration but you can skip the following steps:
- Cloning database procedure
- Starting postgresql cluster (it was already started after EM configuration).
- Registration procedure
For the installation of Kamailio follow the steps mentioned in Kamailio Configuration.
When done, start the SRE as mentioned in Starting the SRE. There configure the supervisord-programs.conf and set up all the EM and needed CP modules in autostart = true.
SRE licensing
SRE comes with a licensing model based on license keys. Without any license, by default the SRE is delivered with basic modules and nodes e.g. with a capacity of 1 CAPS for SIP.
There are two types of licenses
- Module Licenses
- Execution Licenses
There are different types of Module licenses
- Registrar
- CAC
- Accounting
- LDAP (client)
- Stir/Shaken
- ENUM/DNS client
These modules are delivering additional nodes to the SRE.
The SIP/HTTP/ENUM execution licenses allows to increase the capacity in CAPS/sessisions.
All these licenses allow to specify an expiration date. Multiple licenses could coexist on the SRE.
In terms of capacity and expiration date, the system will always take into account the highest value available within the licenses installed.
If some modules expire, the nodes within these modules will still be available in the existing service logics and will continue to work but we won't be able to add a node from this module.
Activate the Licenses on SRE
Connect on the SRE GUI and go to System - Licenses
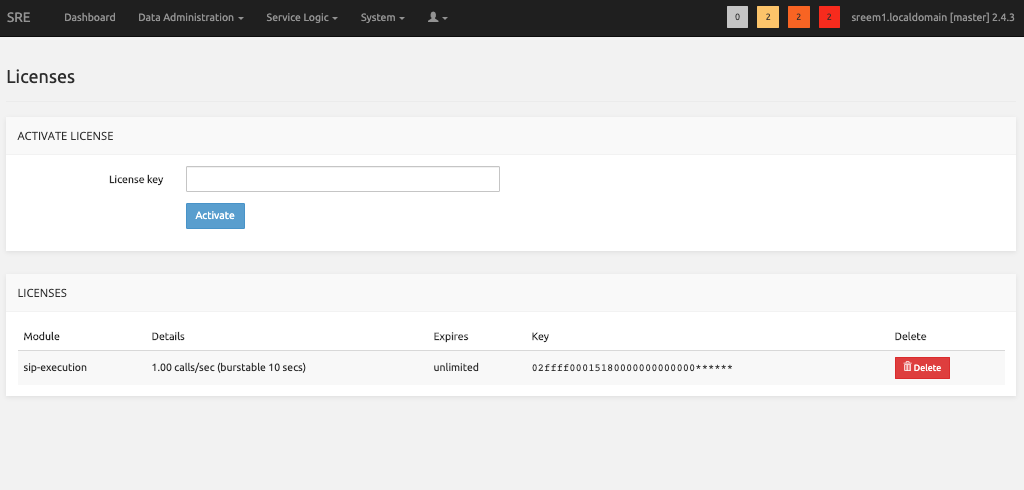
There, paste the keys provided by Netaxis and click Activate
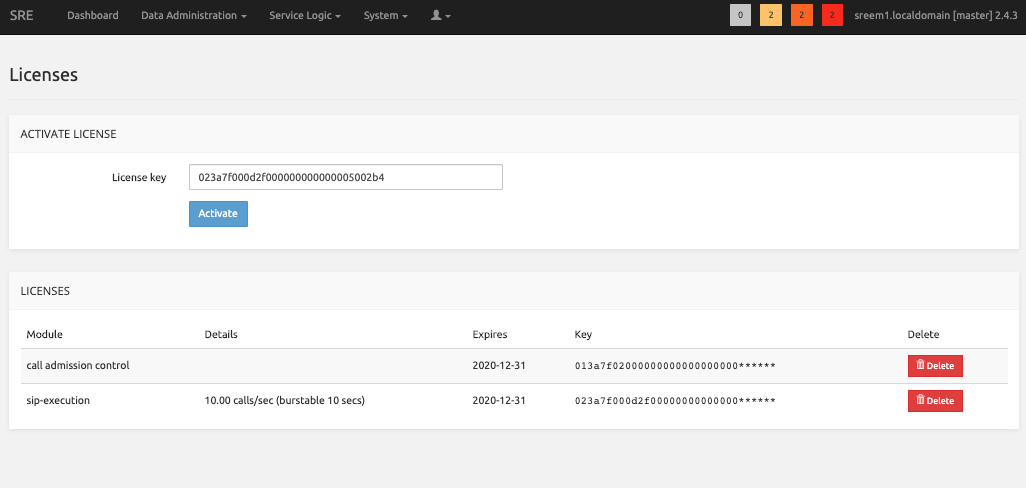
SRE Upgrade
It is strongly recommended to take all relevant backups of an existing platform before proceeding to an upgrade. Refer to the SRE Operations & Maintenance guide for more details:
- Database backups (automatically done and stored on the master EM both in "basebackup" and "dump" formats)
- Config files (e.g., SRE sre.cfg, supervisord-programs.conf, Kamailio config files: e.g., kamailio.cfg, database config files: pg_hba.conf, repmgr.conf
- CDR files (if needed)
To obtain the 4.x rpm files needed for the installation, please contact your Netaxis Representative.
Patch Update Within 4.0
The patch update of a 4.0 platform can be done by using the new rpm.
Verify in the Release Notes if there are any other preliminary / post operations to be carried out other than the update itself.
To launch the upgrade, on all nodes, one by one starting from the master EM, do:
sudo yum install /<path>/sre.4.0.x.-y.x86_64.rpm
sudo systemctl restart sre
The installer will remove the existing release and setup the new one. It will also restart the SRE service (i.e. all the SRE processes).
On CPs merge the changes from /opt/sre/etc/kamailio/kamailio.cfg to /etc/kamailio/kamailio.cfg with:
sudo vimdiff /opt/sre/etc/kamailio/kamailio.cfg /etc/kamailio/kamailio.cfgOnce changes have been aligned, if any, restart Kamailio to take them into account:
sudo systemctl restart kamailioAfter the upgrade is done at least on 1 CP node, make sure the CP is handling calls in the expected way, as the previous release. Verify that CDRs are created on EMs for the calls handled by this CP.
If this is confirmed, please proceed with all other CP nodes.
In case of issues you can rollback to the previous patch release by doing a:
sudo yum downgrade /<path>/sre.4.0.x.-y.x86_64.rpmMajor Upgrade from 3.2 or 3.3
SRE 4.x is supported on RHEL 8 OS.
You must upgrade the internal db schema. Therefore on the master EM node run:
sudo /opt/sre/bin/sre-admin db upgradeRemove SRE crontab if present.
sudo rm /etc/cron.d/srecrontabConnect on the SRE GUI and go to System - Settings , select the "backup and jobs" section and enable jobs accordingly.
Licenses need to be regenerated.
